How to set up Invoicing from TimeTrak Professional
From TimeTrak version 19.2, there is the added ability for users in TimeTrak Professional to not only post a job’s transaction to job costing but post, invoice and email the job’s invoice.
Please note: TimeTrak does not currently allow the invoicing of foreign currency jobs or serialised stock.
This whitepaper will take you through the configuration to provide the ability to Invoice from TimeTrak Professional.
Within the TimeTrak Administrator Console, under Global System Setup > Admin settings as per below there is some additional invoicing settings.
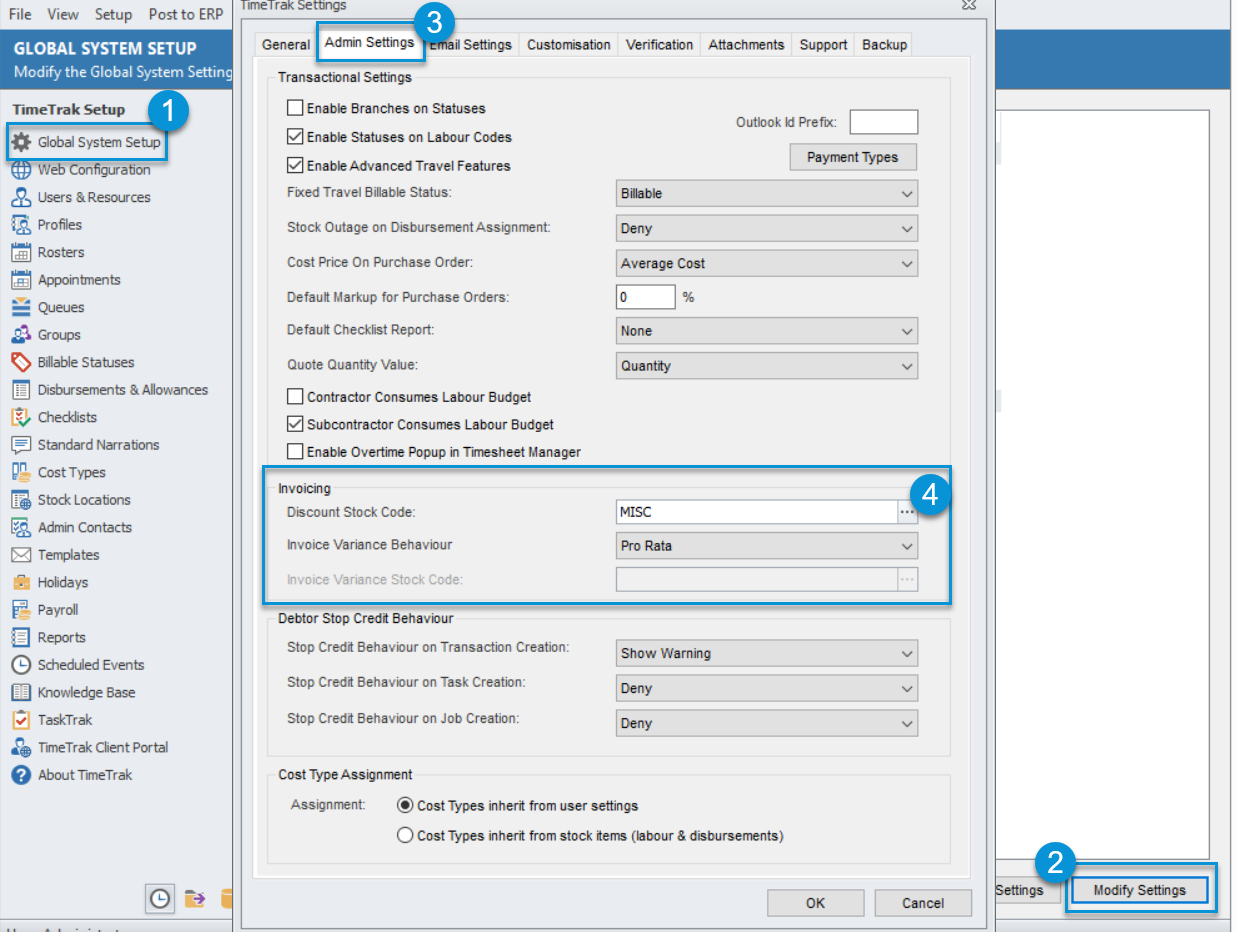
Invoicing Discount
Discount Stock Code: The stock code that is specified in the Discount Stock Code field within the TimeTrak Administrator Console, as per above, is the stock code that will be used when discounts are applied on invoicing.
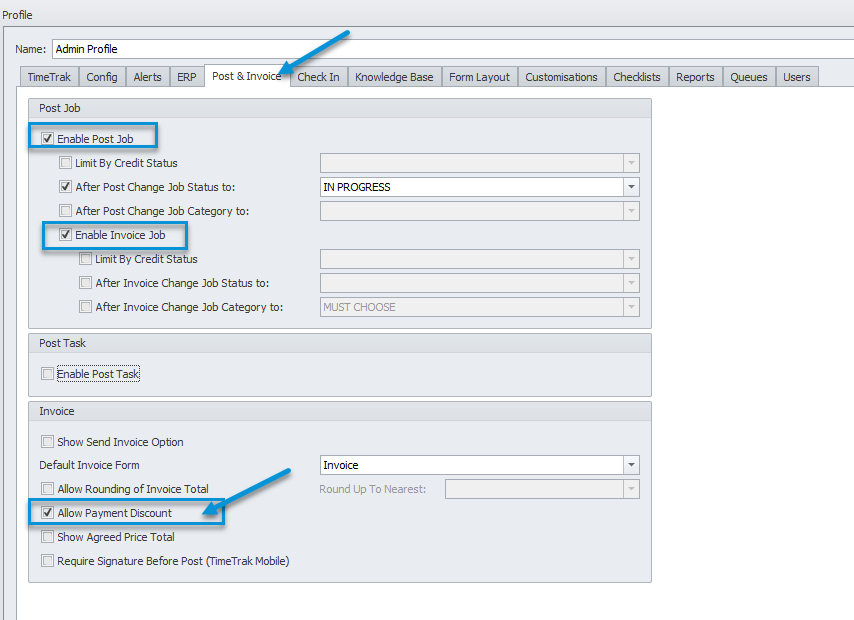
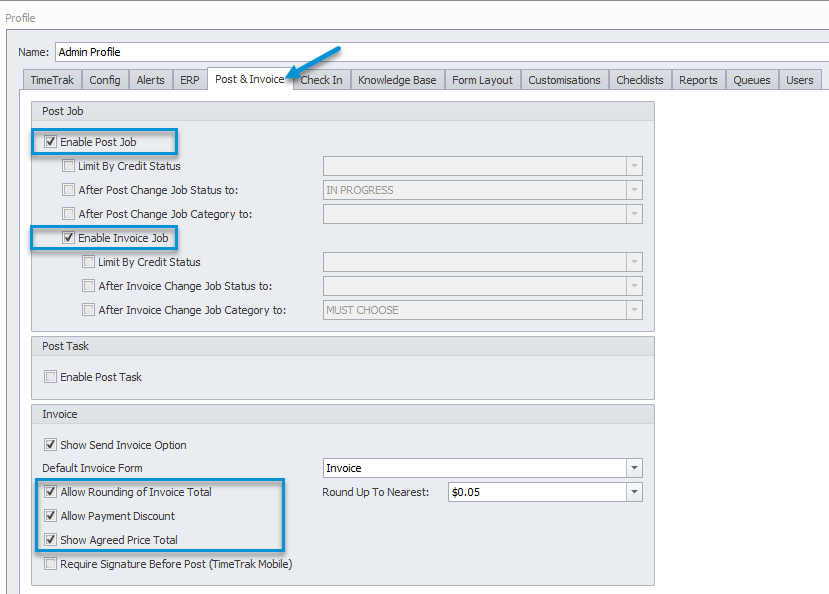
In order for users to be able to apply a discount to the invoice, their profile must have the below settings enabled:
- Enable Post Job
- Enable Invoice Job
- Allow Payment Discount
In this example, to invoice job 7 in Professional.
Open the job, click Post Job as per below:
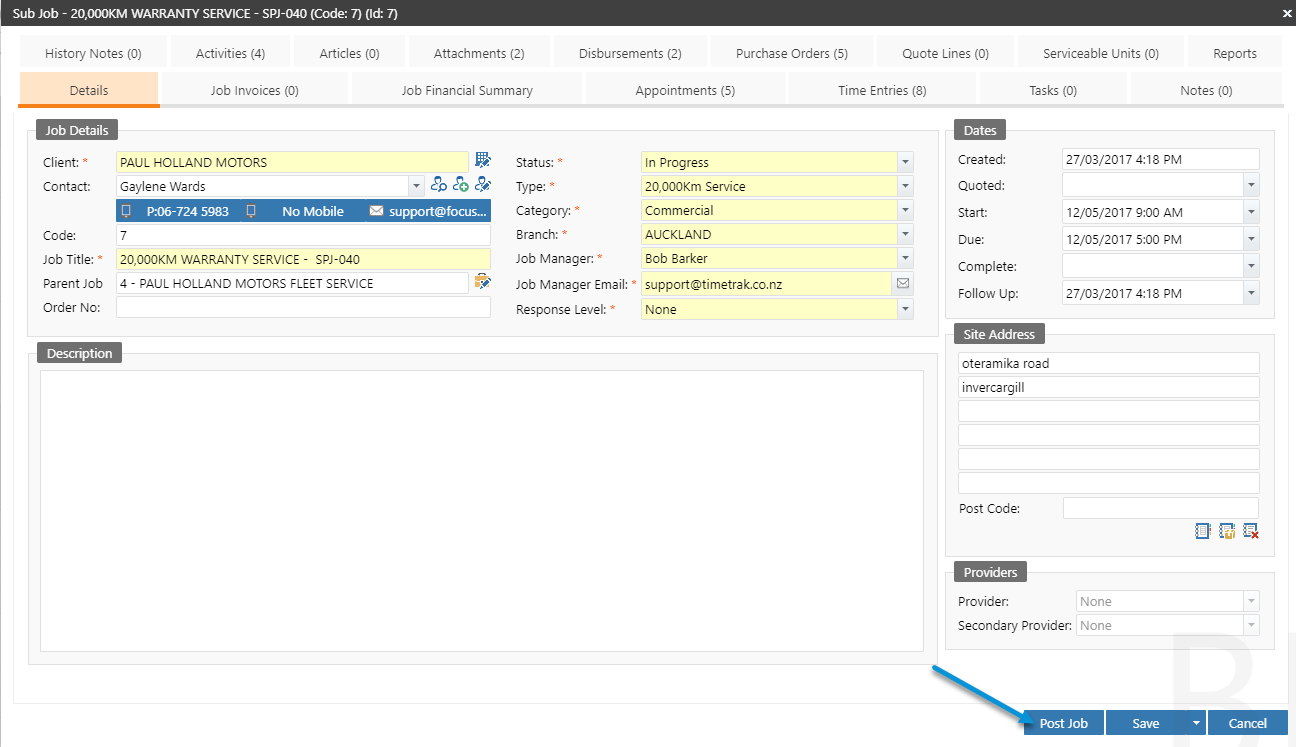
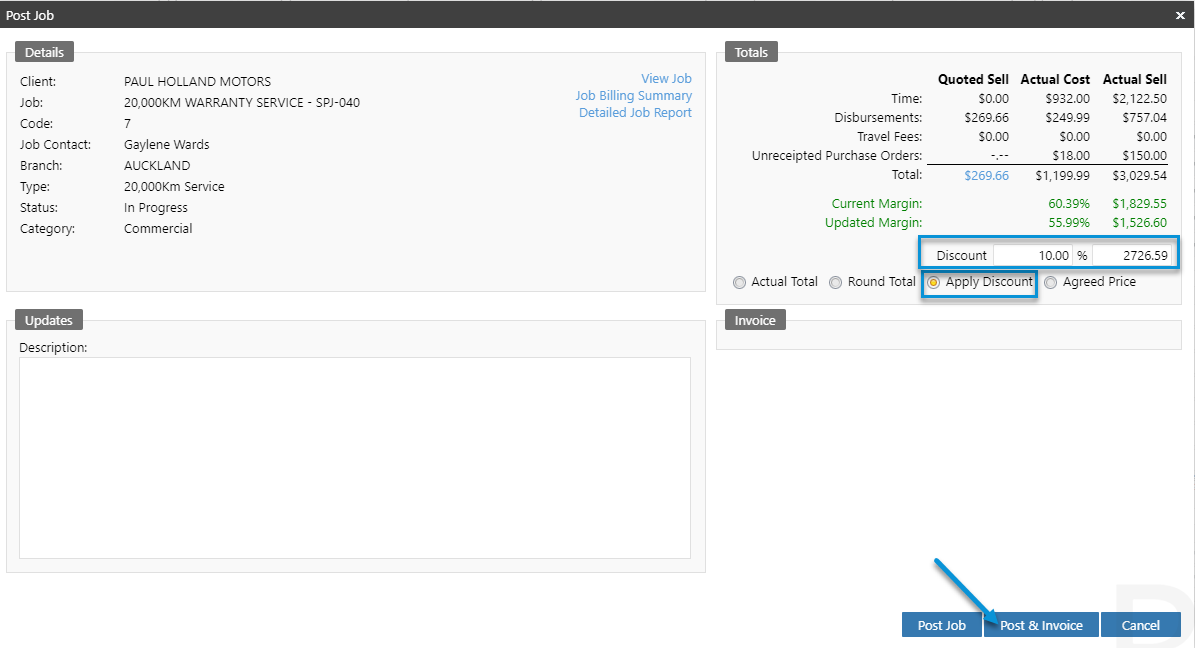
The below new posting screen will display. If the user requires to just post the transactions through to job costing to be invoiced, they can click Post Job again in this screen, which will post the transactions to job costing to be invoiced as per usual.
To post and invoice, and apply a discount to the invoiced amount, click Apply Discount and enter the discount percent as per below.
This will update the Updated Margin column with both the percent and dollar figure as well as display the new invoice amount of $2726.59.
Once happy with the invoice amount, click Post and Invoice.
The transactions will be posted to the job and the job will be invoiced.
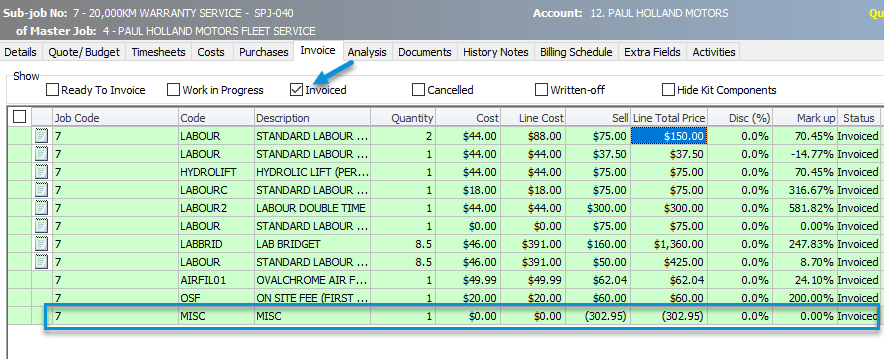
Due to the discount stock code being set to MISC in the TimeTrak Admin Console under global settings, as per below, the 10% discount of $302.95 has been applied to the job invoice at this stock code as per below:
Invoice Variance Behaviour
Invoice Variance Behaviour deals with the variance amount if the invoiced amount is changed.
Users are able to alter the invoice amount if the below settings are enabled against their profile:
There are two options for dealing with the invoice variance within TimeTrak, due to this being set at a global level, which when set will apply to all users when invoicing from TimeTrak.
Variance Stock Code Invoice Variance Behaviour
Variance Stock Code: If Variance Stock Code is the Invoice Variance Behaviour specified as per below, when a user adjusts the actual amount of the invoice to the client, the variance of this will be assigned against the invoice variance stock code specified.

In this example, to invoice job 12157 in Professional.
Open the job, click Post Job as per below:
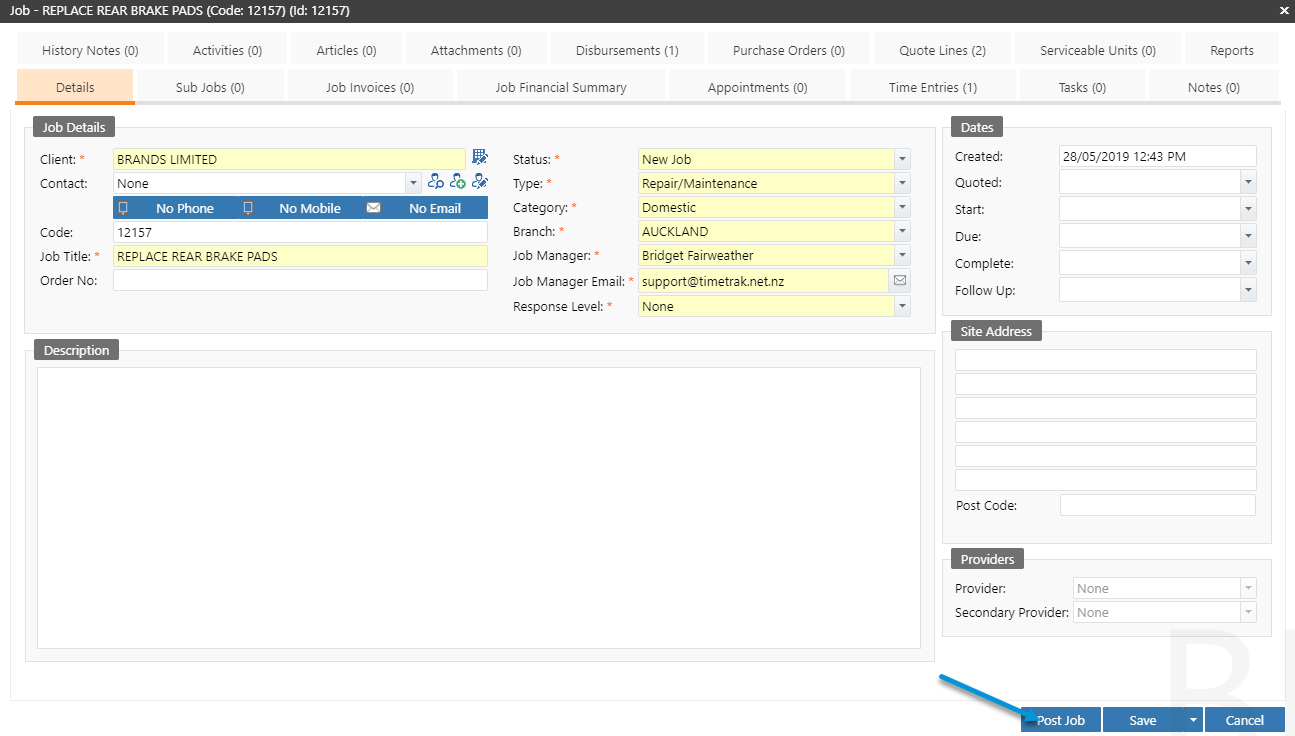
The below new posting screen will display, if the user requires to just post the transactions through to job costing to be invoiced. They can click Post Job again in this screen, which will post the transactions to job costing to be invoiced as per usual.
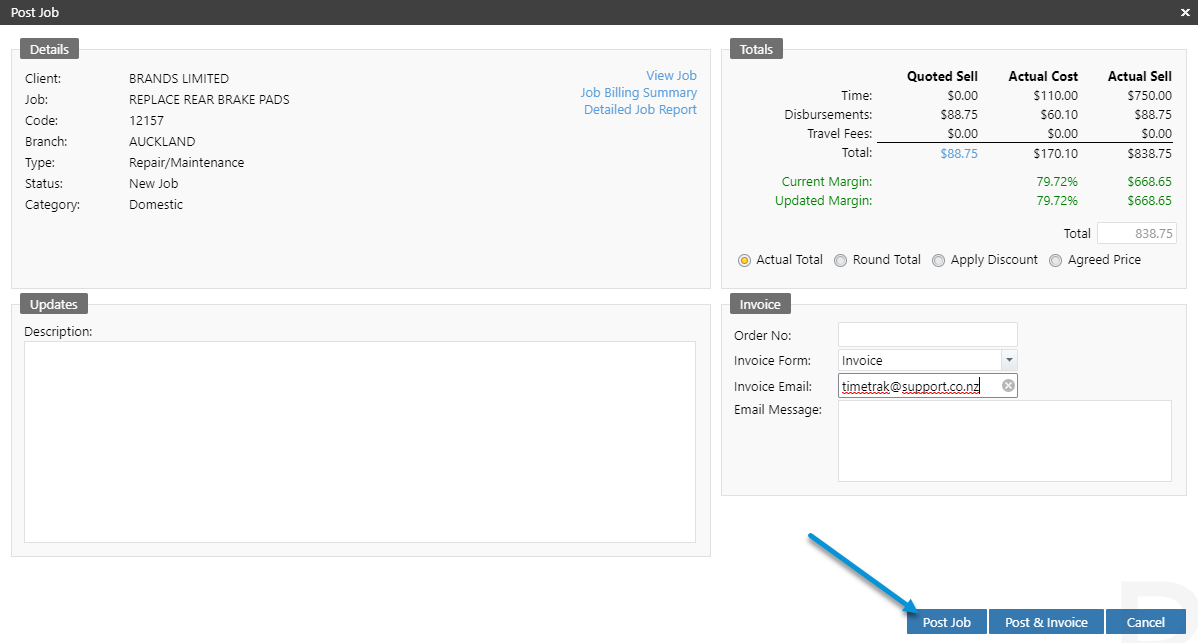
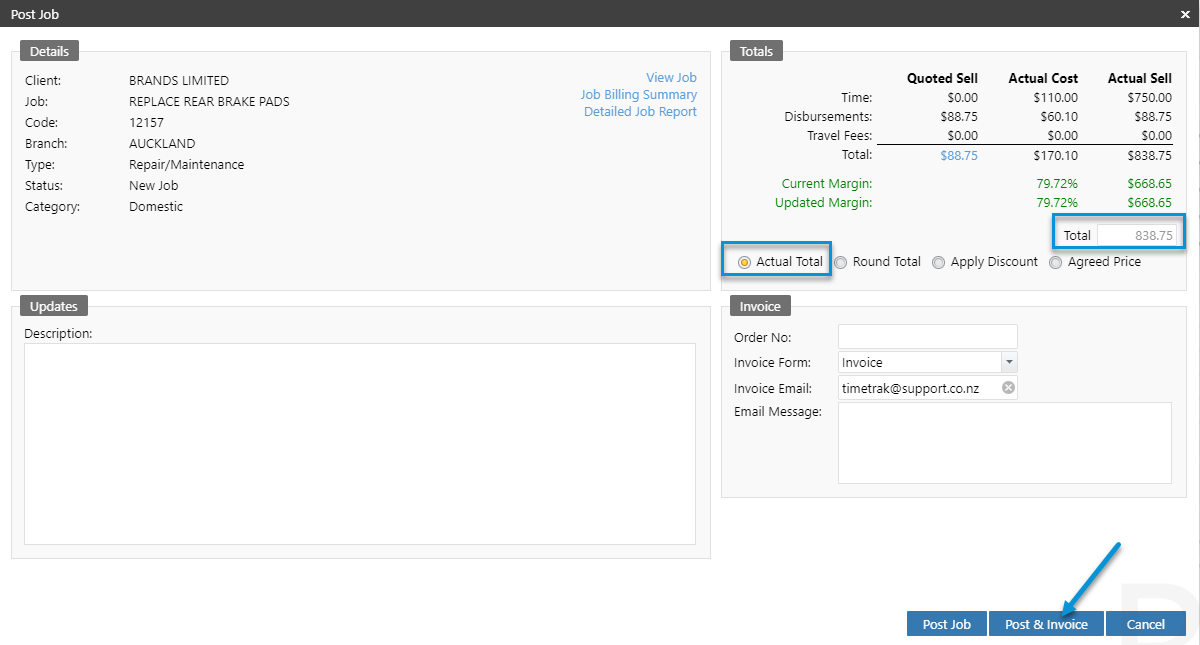
To post and invoice the job ACTUALS click Post & Invoice as per below:
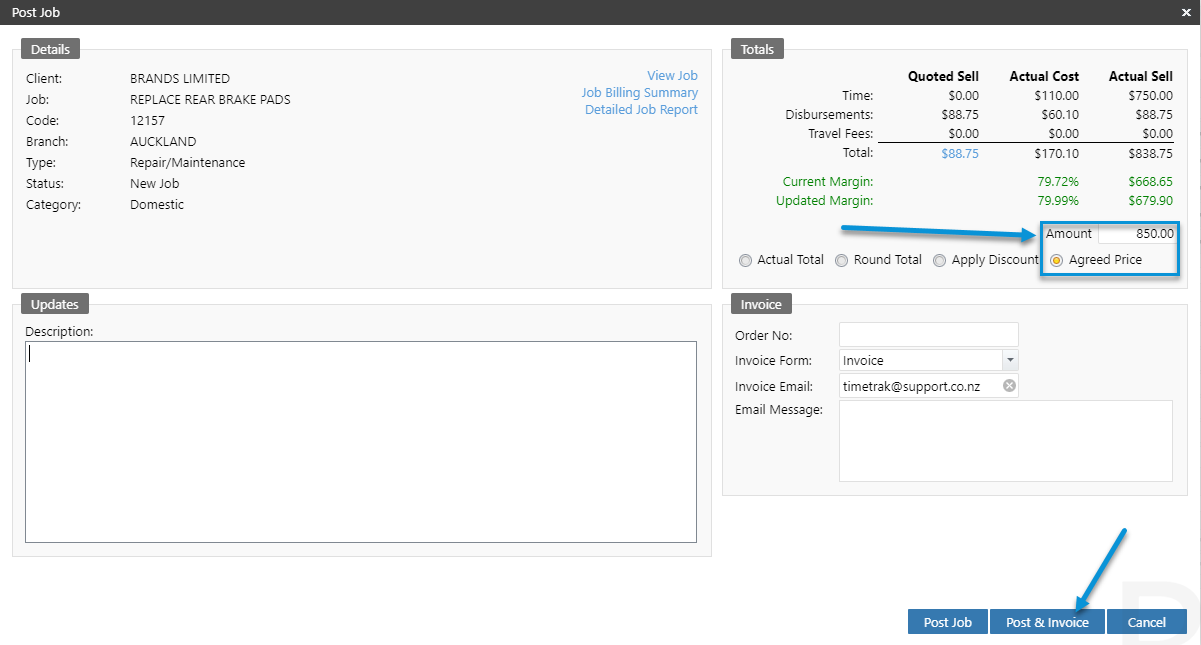
To update the total that is to be invoiced, tick on Agreed Price and update the Amount figure in this case I actually want to charge $850.00. Then select Post and Invoice as per below:
The transactions will be posted to the job and the job will be invoiced.
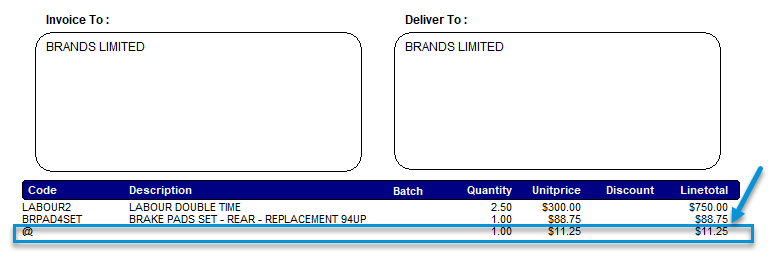
Due to the Invoice Variance Behaviour being set to Variance in global settings and the invoice variance stock code being set to @, against the invoice generated the amount that the invoice was adjusted by has been set to this specified stock code as per below:
Pro Rata Invoice Variance Behaviour
Pro Rata Invoice Variance: If Pro Rata is the Invoice Variance Behaviour specified as per below, when a user adjusts the actual amount of the invoice to the client the variance of this will be split across the invoice lines.

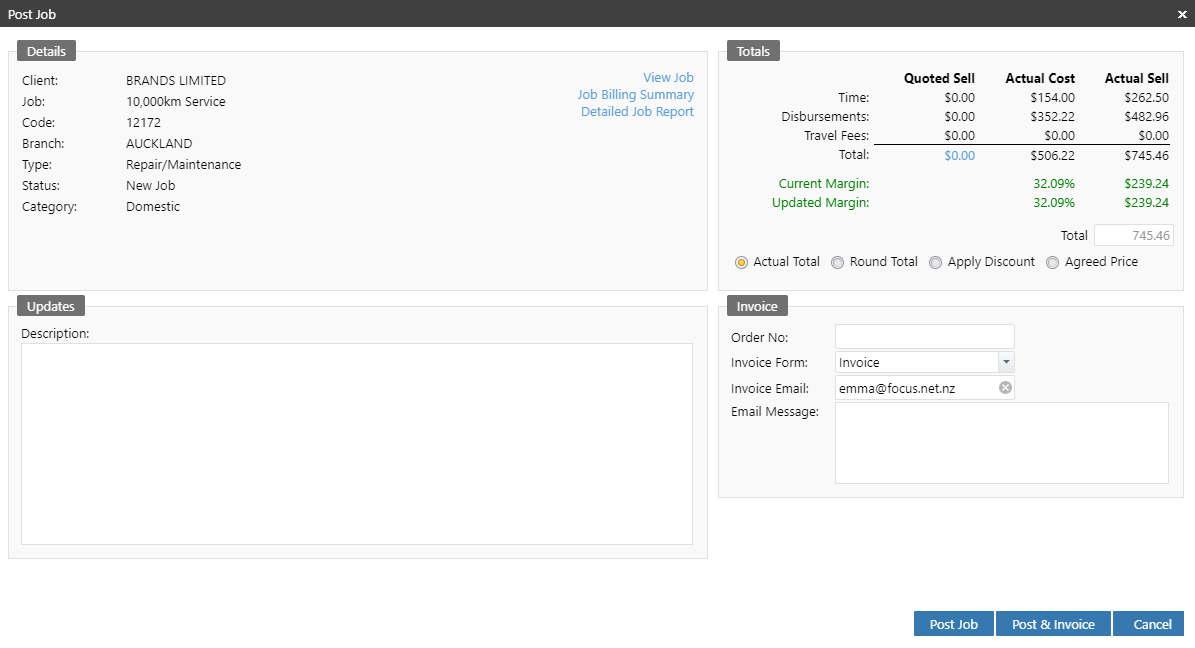
In this example, to invoice job 12172 in Professional follow the same steps as per above.
Enable Agreed Price where the Amount of the invoice can then be updated.
In this case, the amount is changed from $745.46 to $950.00
As per below the Current and Updated Margin is updated to reflect the margin both dollar and percent to reflect the change in the invoice total.
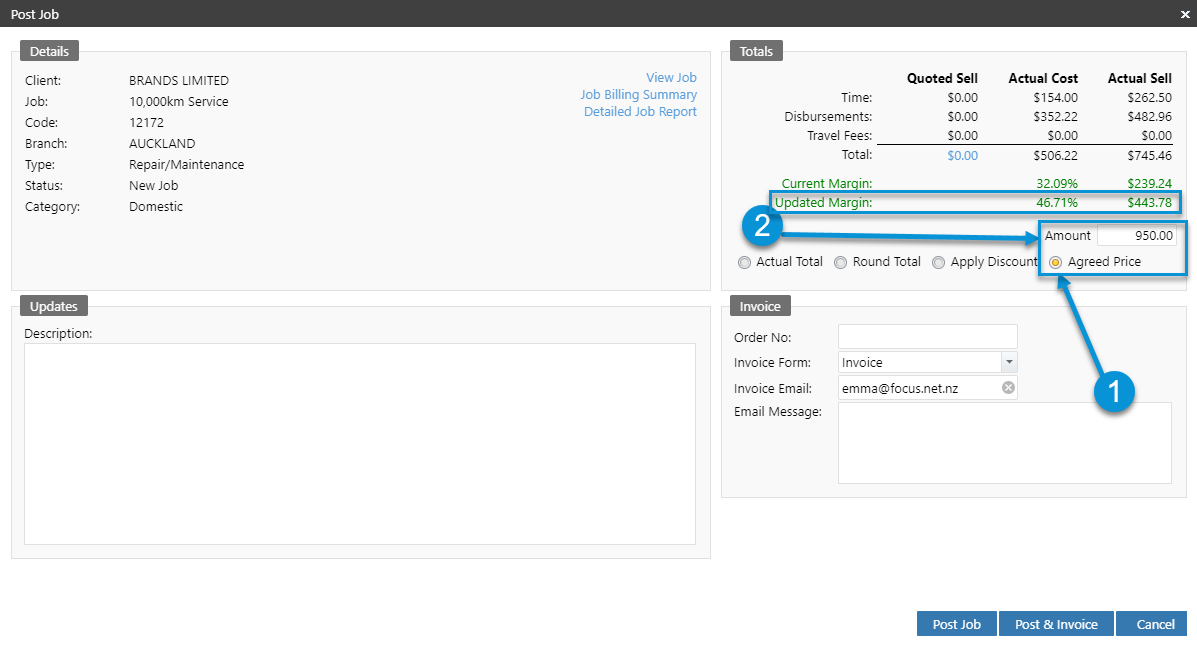
Click Post & Invoice
The transactions will be posted to the job and the job will be invoiced.
Due to the Invoice Variance Behaviour being set to Pro rata in global settings, against the invoice generated the amount that the invoice was adjusted by has been split across the invoice lines as per below:
Time Entries on the job were a total of $262.50, but these have been updated to what they were invoiced at $334.53 as per below on the time sheets tab:

Costs on this job were $444.30 and $38.66, but these have also been updated to what they were invoiced at ($566.21 and 49.27) as per below on the cost tab:

These figures are what has been invoiced as per below, which is due to the increased invoice amount of $204.54 being pro-rated across the lines by value.
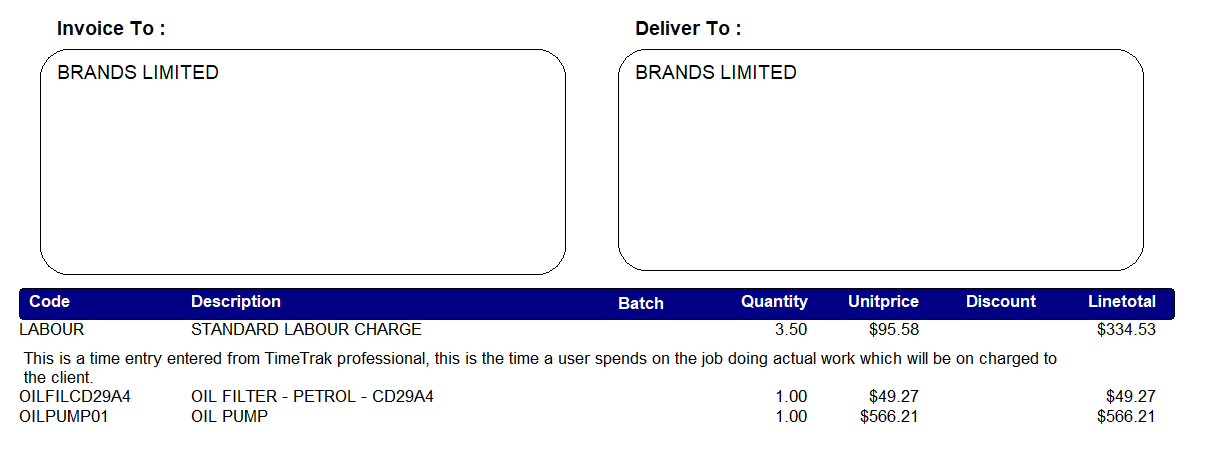
The calculation for this pro-rata amount is as follows:
Increased Invoice Amount ($950.00) – Original invoice amount ($745.46) = $204.54 Increase
Increased amount ($204.54) divide by the Original Invoice Amount ($745.46) = 0.2743809
Original time amount ($262.50) multiplied by the increase (0.2743809) = Increase for the time ($72.024986)
Original cost amount ($444.30) multiplied by the increase (0.2743809) = Increase for the cost ($121.90743)
Original cost amount ($38.66) multiplied by the increase (0.2743809) = Increase for the cost ($10.607565)
Invoice Quoted Amount
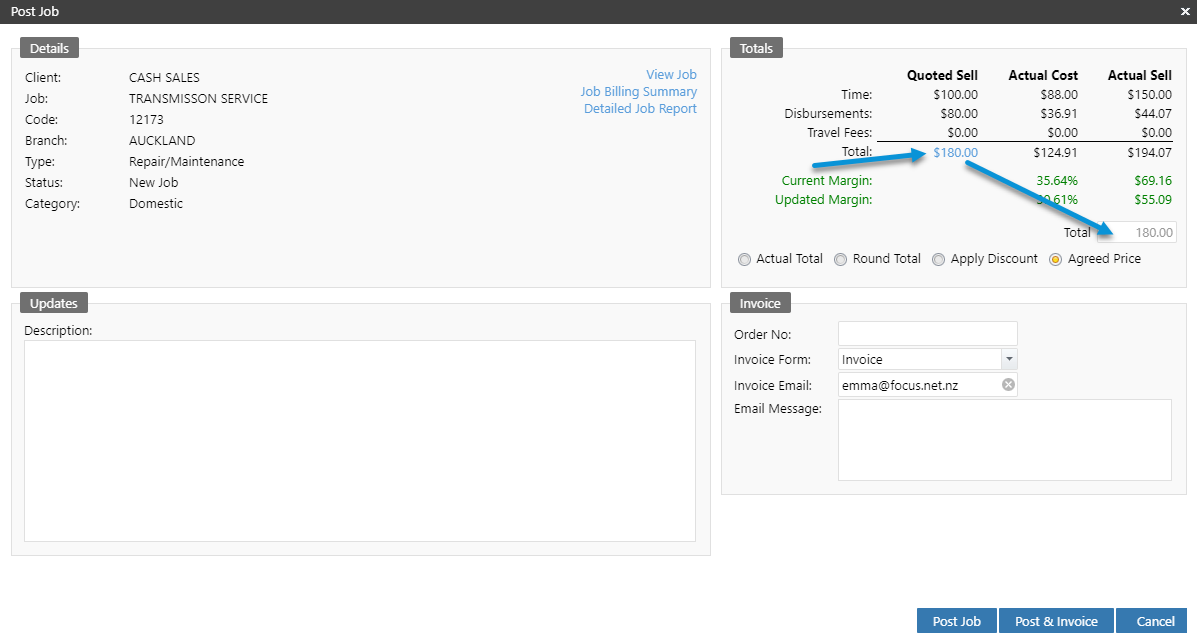
If the job has been quoted, and the user has profile setting “Show Agreed Price Total” enabled then on the posting screen they can update the amount of the lines based on the quoted price.
In the below example; the job has been quoted at $180, the job actual is $194.07:
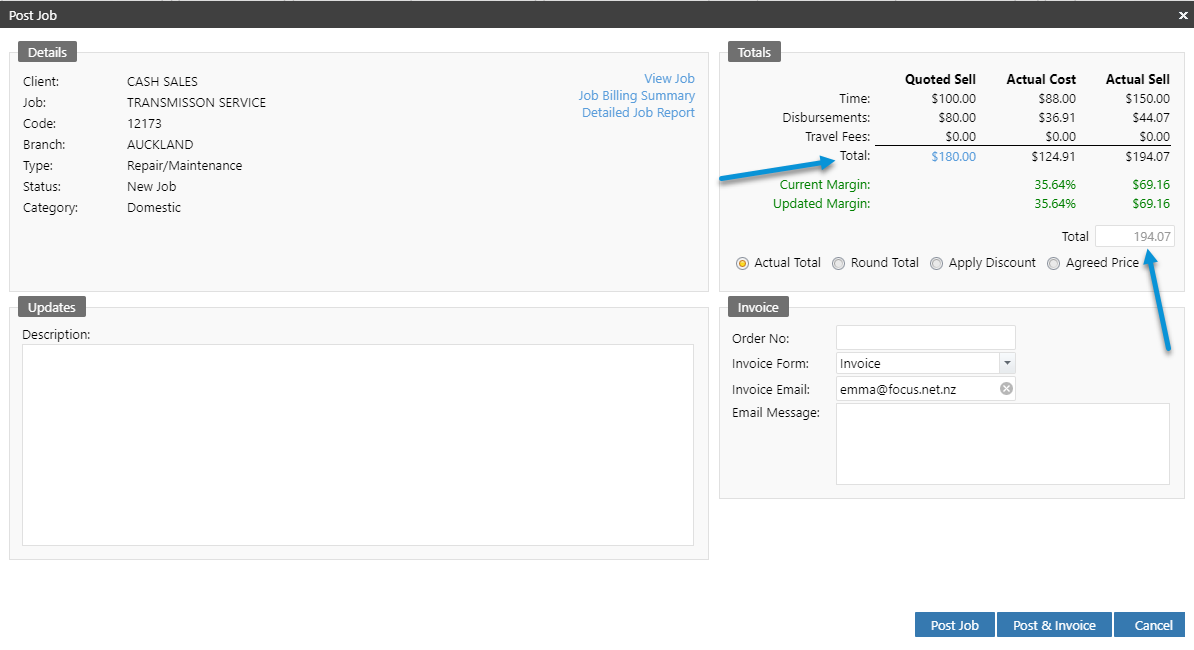
To quickly bill the quoted value, the user can click the quoted amount which will update the total to be invoiced as per below:
Update Job Description on Posting and Invoicing
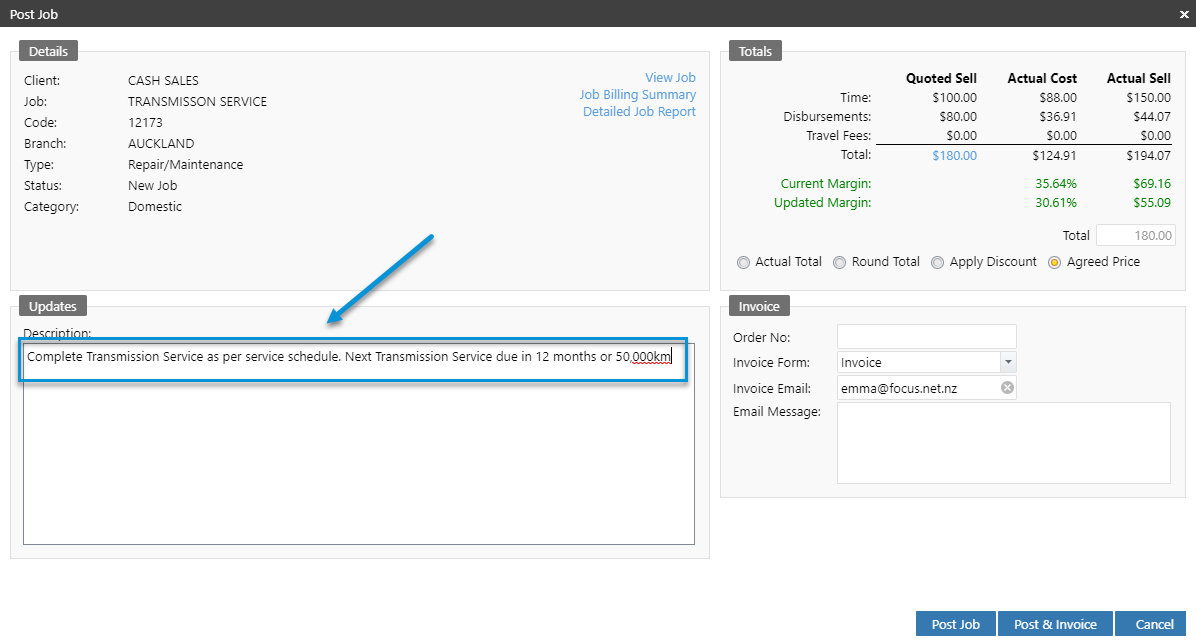
Due to a lot of businesses displaying the Job Description on their invoice form, the posting form has been altered to include the ability to update the job description at the time of posting or posting and invoicing.
Send Invoice after it has been generated from TimeTrak
With the added function of “Scheduled Events” in TimeTrak 19.1, users could set up a scheduled event to send all invoices generated, which would automate the emailing of invoices to clients.
For more on scheduled events within TimeTrak, click here.
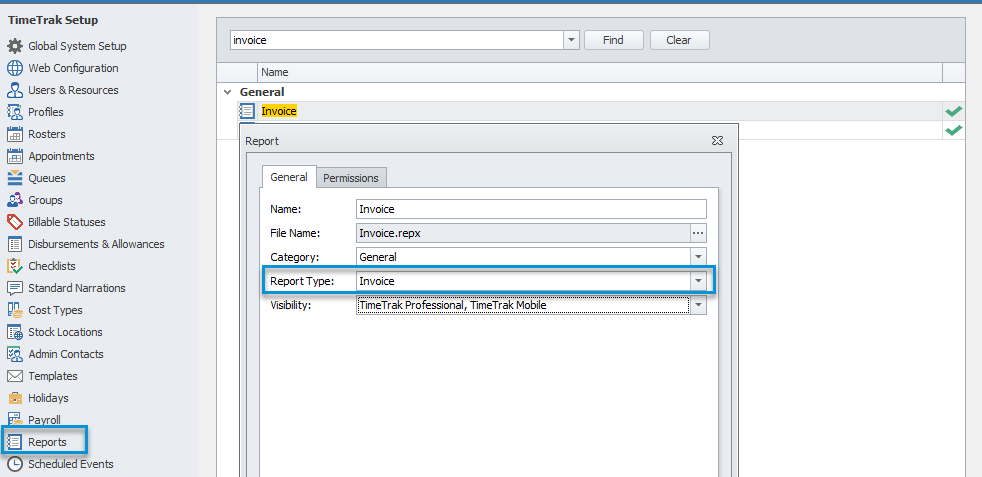
If users wish to manually email the invoice from TimeTrak once it has been generated, they will need an Invoice Report loaded in the TimeTrak Administrator Console, their profile must have access to this report also.
There is a standard Invoice Report available, which can be imported and then customised to include business logos etc.
These reports are available within the Console under the reports section as per below:
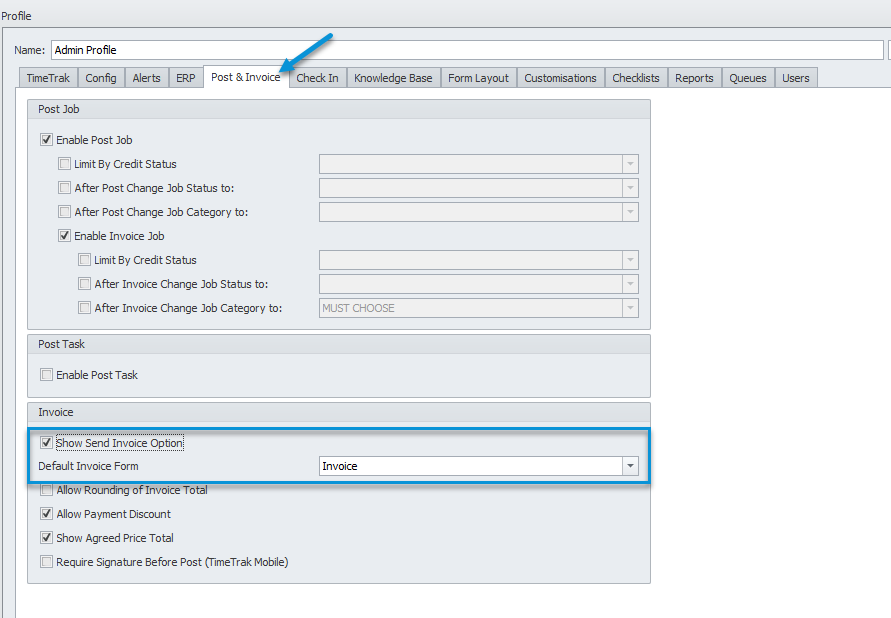
Against the users profile, they must have “Show Send Invoice Option” enabled and specify the default Invoice form as per below:
Once these settings are enabled on the Posting screen, the Invoice section will be available.
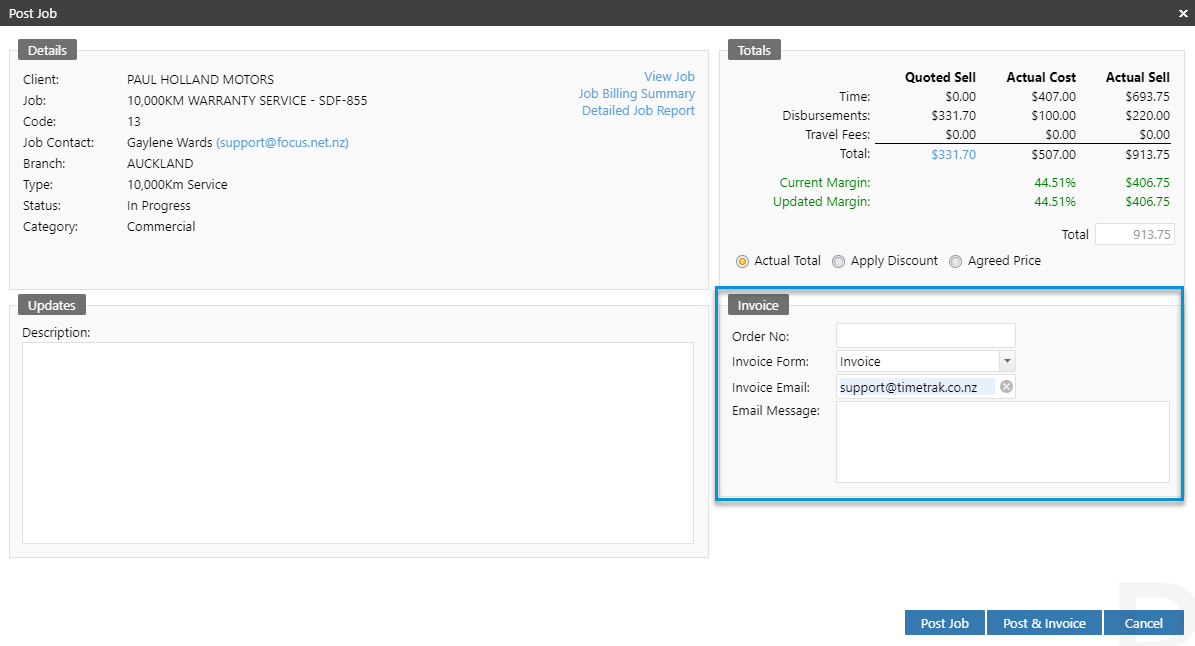
An order number can be entered against the invoice in the Order No field.
The Invoice form selected as the default in the profile will be passed through, although if there was more than one invoice form in the database a different form could be selected from the invoice form drop down list.
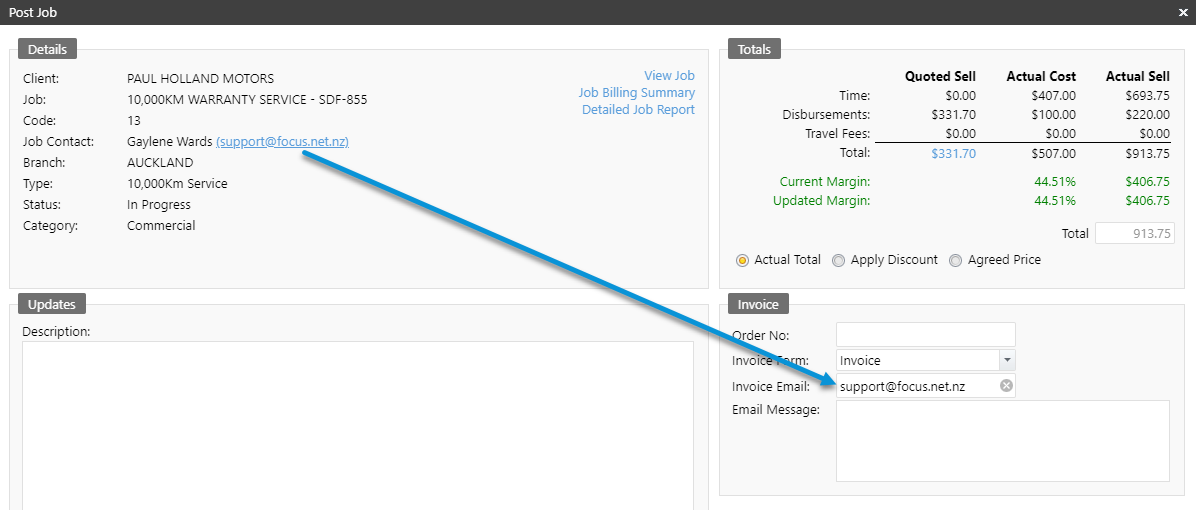
The email address from the client’s account will be automatically pulled through into the Invoice Email field, this can be cleared and manually keyed. There is also the options to click on the job contact’s email address, which will populate the Invoice Email field with the job contacts address as per below:
Users can enter text they would like in the Email message field, then click Post & Invoice which will post the transactions to the job, invoice the job and email the invoice.
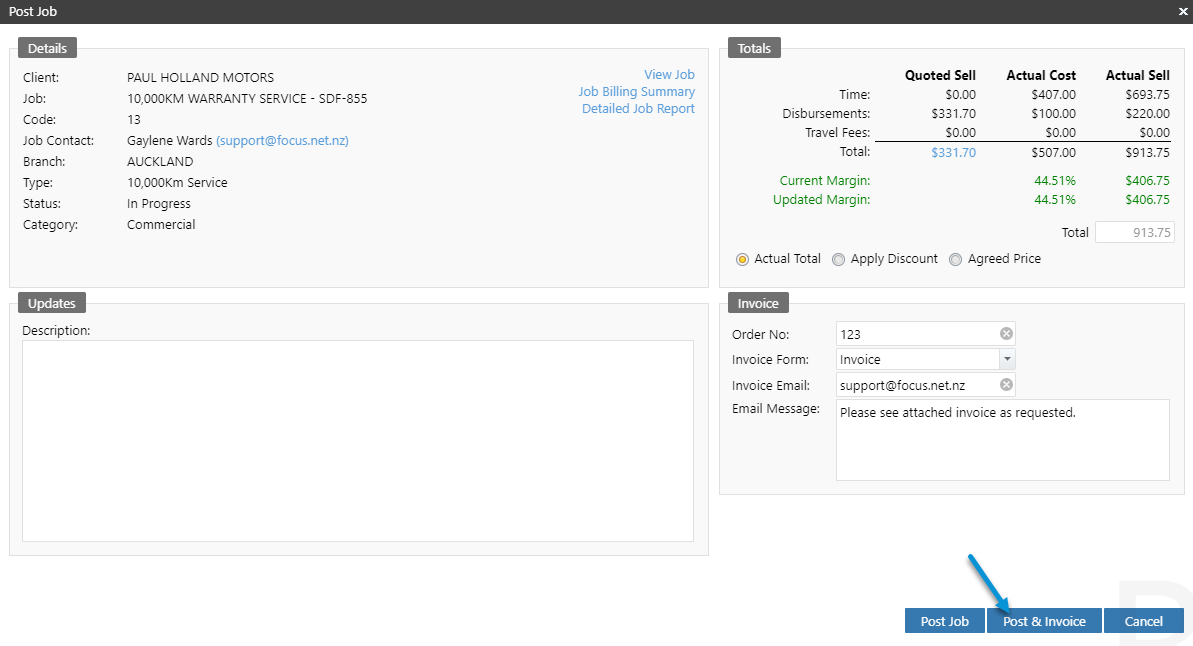
The invoice will then be sent the specified email address.
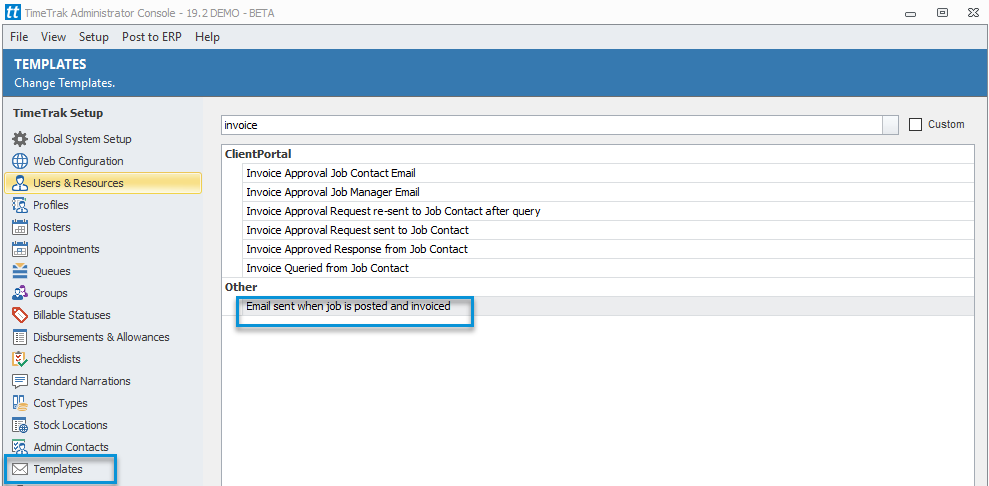
Please note: The Email template that goes with invoices when emailed from TimeTrak is called “Email sent when job is posted and invoiced” this is located under the Templates section within the TimeTrak Administrator Console as per below:
Against the job, there is a new activities tab, which is populated with the invoice number and who it was emailed to, as per below:

From here, the Invoice can be emailed again to another user by clicking the Email icon, as per below:
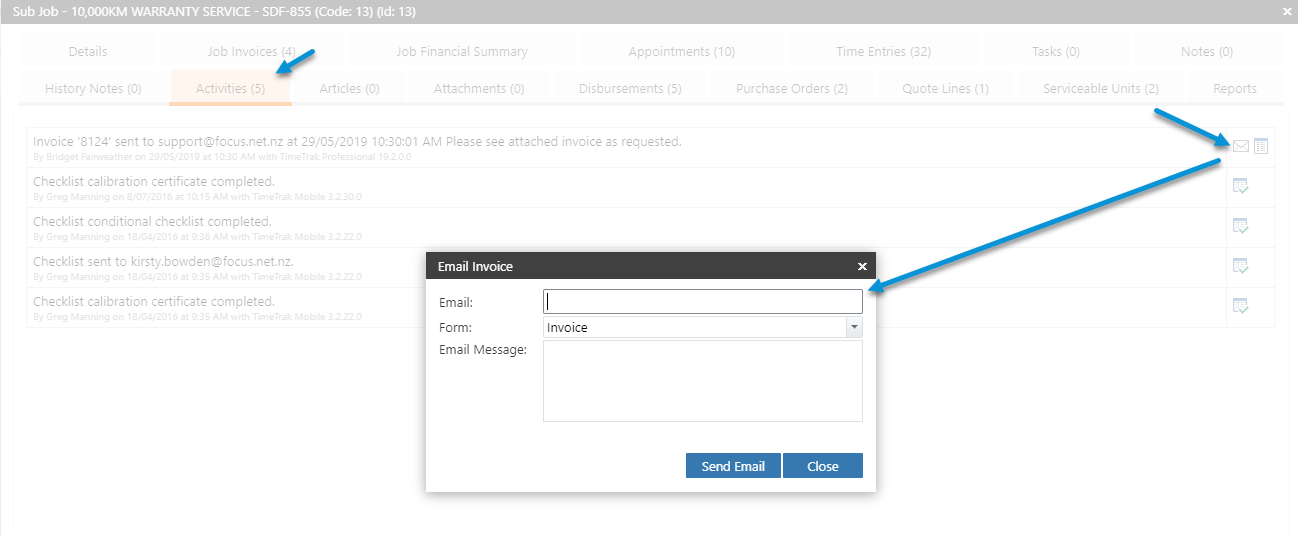
The invoice report can also be run and reviewed by clicking the below icon:

Display Job and Client Transactions:
Adding to this functionality, there is also a new Job Invoices tab against a job, which displays invoices and credits generated from the job.

Against these transactions, there is the same icons as the job activities tab, which allow users to both email and review the invoice form.
If the Invoice was sent from TimeTrak, the TimeTrak Sent column will be populated with the date and time the invoice was sent from TimeTrak.
A Transactions tab is also available against the Client, providing the same functionality as the Jobs Invoices tab.
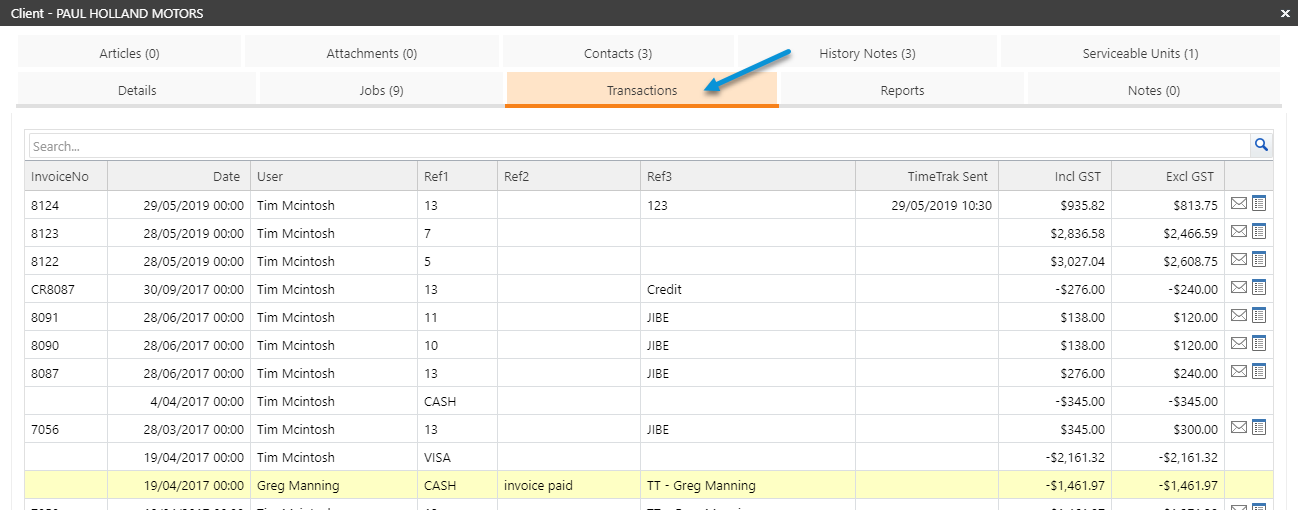
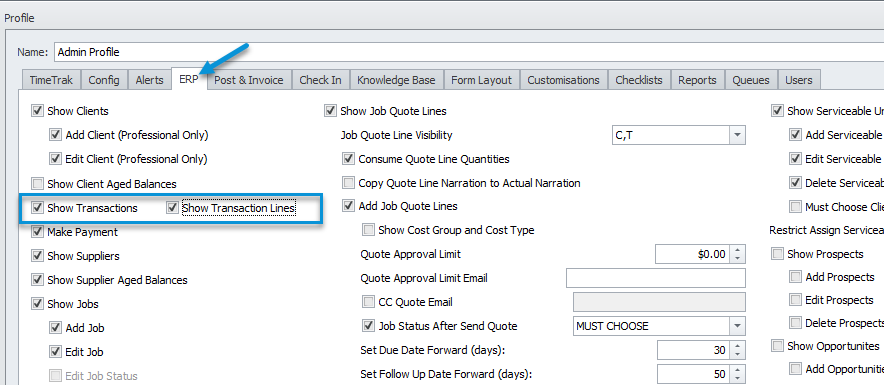
In order for users to see this transactional data, they will need to have “Show Transactions” and “Show Transactions Lines” enabled against their profile as per below:
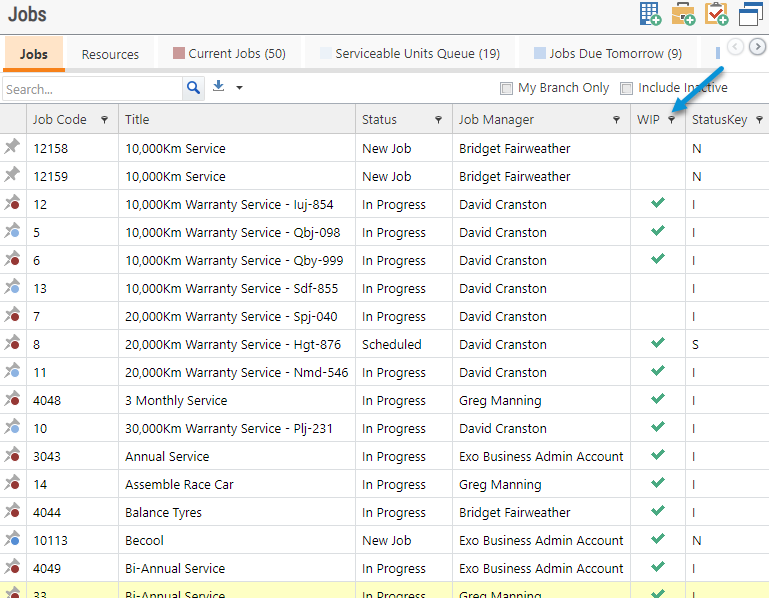
Added WIP and Status Key Column to Jobs Grid in Professional
In TimeTrak 19.2 there is also an added Job grid column “WIP”.
This grid displays a green tick if the job has any WIP (Work in Progress) data entered against it in either TimeTrak or directly against the job in the ERP system.
This clearly shows Professional users that jobs have data entered against them, which may require invoicing.
The Added Status Key field is the Job Status Key which allows users to display the job status without having the Status column description visible (which takes up more room on the screen).
