In this version we have moved all existing beta features into the product as features. This update will require a database update as we have changed and added some fields. Here is an explanation of each new feature and any set up required around them.
Summary
Timesheet Approval – Enabling timesheet approval will allow a user to be alerted when they login if there are users that have time entries that haven’t been verified yet.
Recurring Appointments – Enabling this feature will enable the recurrence tab on an appointment.
Checklist Signatures – This feature will allow signatures to be added to checklists.
Checklist Update – This feature will update the checklists to allow job type filtering, showing the recipients on the checklist, select an email template for the checklist, email the client contact, allow the user to enter an email while filling out the checklist.
Application Activity Logging – This feature will enable logging of the application and version in the activity table when items are created in TimeTrak.
Non-Productive Analysis Report – This feature will enable the Non- productive analysis report.
Copy Job Quote Lines – This feature will enable the ability to copy the job quote lines of a job when adding a new job from a template.
Import Tasks from Job Quotes – This feature will enable the ability to import job quote lines as tasks.
Appointment Time Entry Defaults – Enabling this feature make the time entry tab appear on an appointment. This will allow you to set the default values that will get passed through into the time entry.
Appointment and Task Locking – This feature allow appointments and tasks to be locked.
Serviceable Units – Enabling this feature will enable serviceable units in TimeTrak.
Task Recurrence – Enabling the task recurrence feature will add the ability to set the group when using recurring tasks.
Client Portal Task Grid Update – Enabling this feature will use the new task grid in the TimeTrak Client Portal.
Billable Status Update – This feature will update the billable status to allow the ability to set a status as included in budget.
Disbursement Update – This feature will allow the user to set a cost price and description against a disbursement.
User Update – This feature will add fields against the user to indicate when the user was created.
Add from Job Quote Lines – This feature will enable the ability to add disbursements from job quote lines.
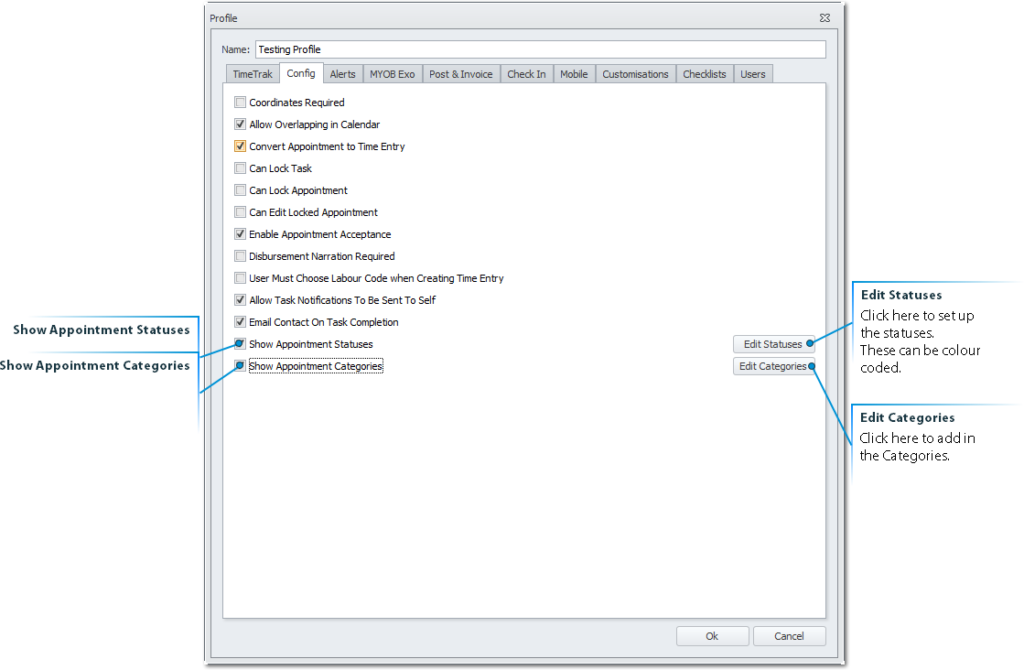
Appointment Status and Category – This feature will enable Appointments to have two selectable drop down fields to help identify them.
TimeSheet Approval
Timesheet Approval allows set users to approve (verify) the time other users in user groups have put into TimeTrak in a weekly or monthly cycle.
To enable TimeSheet Approval log into the TimeTrak Admin Console. Drill into a Profile and go to the Alerts Tab.
From within the Alerts Tab tick on either Weekly or Monthly TimeSheet Approval. This feature is only available to TimeTrak Professional Users.
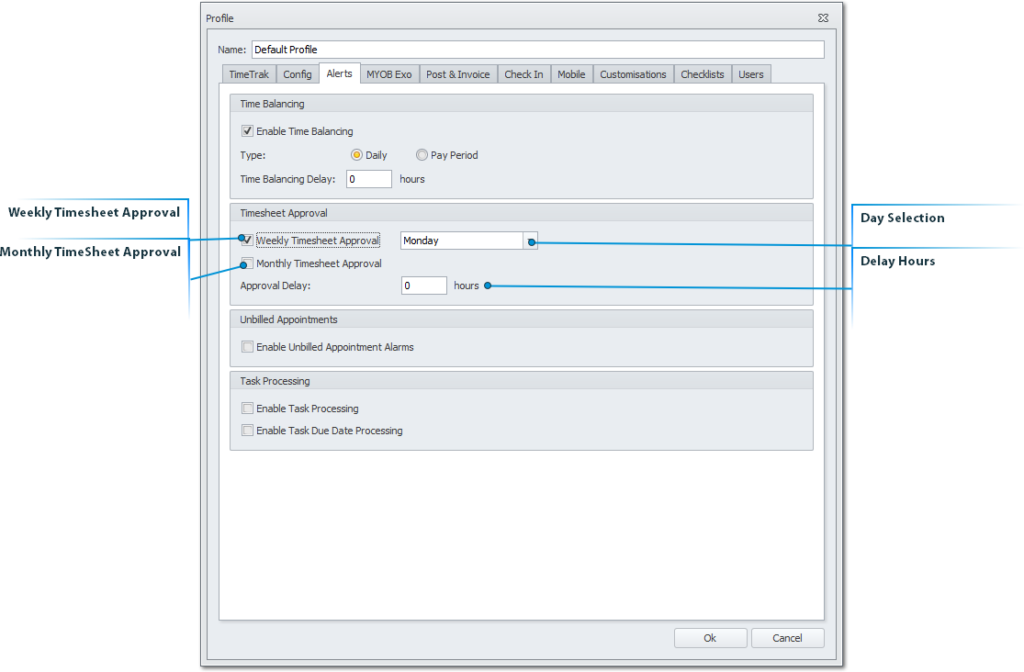
Weekly Timesheet Approval
Tick this to enable a weekly TimeSheet Alert for TimeSheet Approval.
Monthly TimeSheet Approval
Tick this to enable a monthly TimeSheet Alert for TimeSheet Approval.
Day Selection
Select which day the Alert will be actioned on.
Delay Hours
Enter in a hour value if users should be able to log into TimeTrak Professional before having to action the TimeSheet Approval.
Drill into the User who is to be Approving the Time of others.
Within the Groups Tab there is now the tick box option to enable that user to approve time for specific groups.

When the user with Approval allowed logs into TimeTrak Professional they will be notified of all selected users in the assigned groups time entries to be approved.
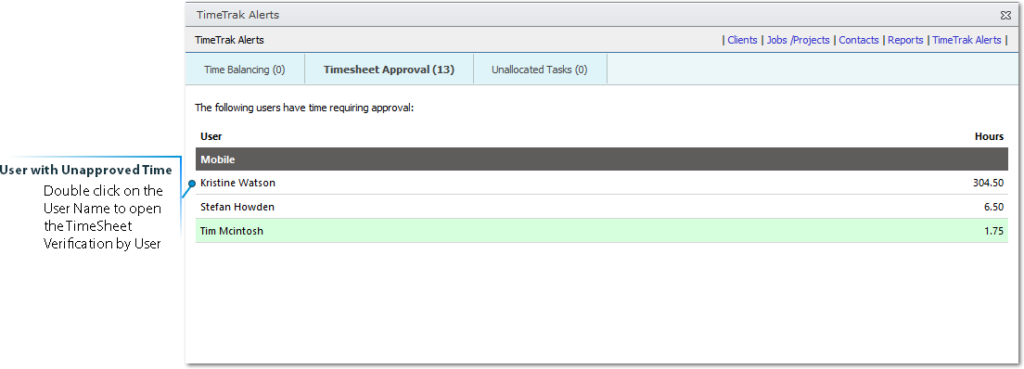
Verify or update the time entries.

Recurring Appointments
This feature allows users to create recurring appointments.
Behind the scenes when a recurring appointment is created, it becomes a pattern in the database called a series. Note:
When editing the recurrences (or series) of appointments if the user, date, hours or minutes are edited then all occurrences within the series will be recreated. (Including those appointments in the past already converted into Time Entries) so best practice is to delete the series of recurring appointments and create a new series.
In TimeTrak Professional to set up recurrence on an appointment go to the Recurrence Tab: Tick on Enable Recurrence.
Then select the pattern. The options include daily, weekly, monthly and yearly.
Once the pattern is set up then select the end of the series. The options include no end date, ending after a number of occurrences or a set date.

Profiles contain the User permissions around Recurring Appointments for Mobile Users.
Log into the TimeTrak Admin Console and go into the Profiles Menu, drill into the TimeTrak Tab.
A Profile can allow a user to ‘Edit Appointment Recurrence’, if this is enabled a user in TimeTrak Mobile will be able to edit a recurring appointment or the entire series of Appointments.

Recurring Appointments display a looping icon in TimeTrak Professional and TimeTrak Mobile.
TimeTrak Professional:

TimeTrak Mobile:

Checklist Update and Signatures
Checklists now include the ability to capture signatures, as well as allowing job type filtering, showing the recipients on the checklist, selecting an email template for the checklist, emailing the client contact, and lastly allowing the user to enter an email while filling out the checklist.
When setting up a Checklist within the TimeTrak Admin Console now there are many more options.

To have a checklist capture signatures then add in a signature item to a Checklist.

Within TimeTrak Mobile the Checklist with Signature will look like this:

Application Activity Logging
This adds in extra auditing information for Task and Time Entry activity tabs. The information gathered includes the user taking the action, the date, the module and the version the action was completed in.
Here is an example of a Time Entry Activity:

An example of a Task Activity:

Non-Productive Analysis Report
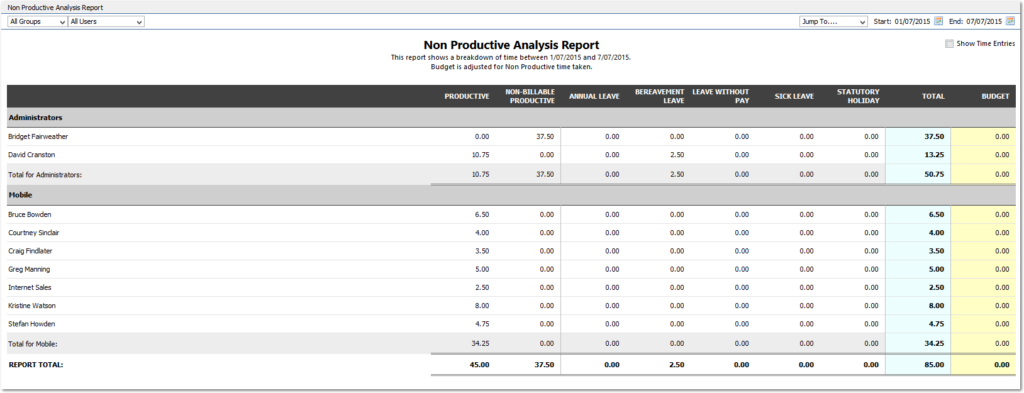
The Non-Productive Analysis Report shows a break down of Productive and Non-Billalbe Productive time as well as identifying each leave type available in TimeTrak and the hours assigned against them.
This report is available in TimeTrak Professional only.
Select the Non Productive Analysis Report from the Reports List:

Copy Job Quote Lines
When creating a MYOB Exo Job from within TimeTrak there has to be at least one template set up.
When the Copy Job Quote Lines is enabled in both TimeTrak and against the template MYOB Exo Job then what quote lines are set against that template will be added to any newly created Job.
Within MYOB Exo set up the extra field X_TT_CopyQuoteLines as a checkbox on the Jobs Extra fields.
(You may need assistance with this from your Exo or Exosoft Consultant)

Once this is set up in, in MYOB Job Costing tick the field on the template job and make sure they have quote lines.
Please note each line on the Quote/Budget tab will need to be set to Copy To = ‘T’ for TimeTrak to pick them up.

When a new Job is created from within TimeTrak and the template with Copy Quote Lines is set up then the job will use the same quote lines.
This is fantastic for Project jobs where the same type of work is quoted.
To take this a step further you would use this feature in conjunction with the Import Tasks from Job Quotes functionality and turn the quoted lines into Tasks within TimeTrak Professional.
Import Tasks from Job Quotes
This feature will allow a user to turn the quote lines on the MYOB Job Costing Job and turn them into Tasks in TaskTrak from a single screen.
This would be a benefit to users who quote out projects, breaking down the pieces of work involved and then normally mimic this in TimeTrak and TaskTrak.
On the MYOB Job Costing Job make sure the Quote/Budget Lines are set up with the Copy To = ‘T’

Within TimeTrak Professional, drill into the Jobs Screen Select the correct Job

Click into the Tasks Tab
Click on the Manage Tasks Button

All Quote lines will show in the Manage Tasks Screen.
Each line can be edited, assigned to a user and given a Task Description.

Appointment Time Entry Defaults
TimeTrak now allows the TimeTrak professional users to set the defaults of the Time Entry against the Appointment.
This means when the Appointment is converted into a Time Entry it will set to those selected defaults.
The benefits to this include if the staff person cannot see some of the Time Entry settings, or a piece of work is to be charged out differently from the normal task settings.
Create an Appointment in TimeTrak Professional
After setting the General set up of the Appointment, click into the Time Entry Tab.
Tick on the ‘Set the default values that will be used when converting the appointment to a time entry’ option. Update the Status, Labour Code, Cost Group, Cost Type and Rate as required.

Any defaults set up will flow into the created Time Entry across both TimeTrak Professional and TimeTrak Mobile.
Appointment and Task Locking
This feature works in two parts of TimeTrak Professional and TimeTrak Mobile. There is the locking of a Task and the locking of an Appointment.
If a Task is locked then the Estimated Time cannot be edited.
This is designed for the scenario where you have a Head Task and Sub Tasks with the Total on the Head Task Totalling from the Sub Tasks.
Within the TimeTrak Admin Console there are permissions against the Profile settings for users.
Once the Head Task is locked then the Estimates cannot be edited by users without permission to edit locked Tasks.

For Appointment locking there is also User permissions within the TimeTrak Admin Console, Profile settings.
When an Appointment is locked then the user assigned the appointment will not be able to edit the start time and date, the end time and date as well as the total hours of the appointment.

Serviceable Units
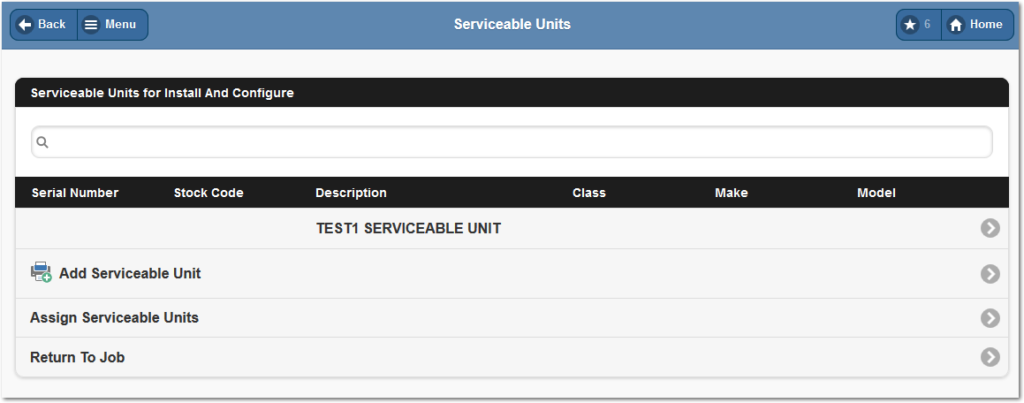
Serviceable Units are now available in TimeTrak Professional and TimeTrak Mobile.
A Serviceable unit is saved against a Debtor Account, assigned to a MYOB Job and allocated to a Task. To enable Serviceable Units in TimeTrak, log into the TimeTrak Admin Consol.
Within the Global System Setup, click on Modify settings.
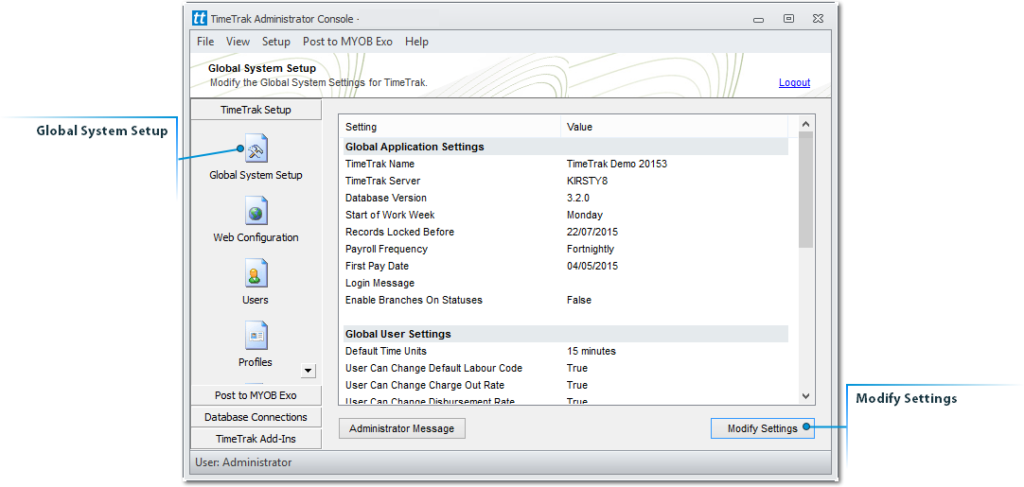
Within the General Settings tick on Enable Serviceable Units.

Once this is enabled , then the access permissions are against the Profiles. Go into the Profile Menu and into the MYOB Exo Tab.

Within TimeTrak Professional the Serviceable Units will show as a Tab on the Client, Job and Task.

Users can add and edit the Serviceable Unit Contact History in both TimeTrak Professional and TimeTrak Mobile.

In Mobile the serviceable units look like this:
Task Recurrence
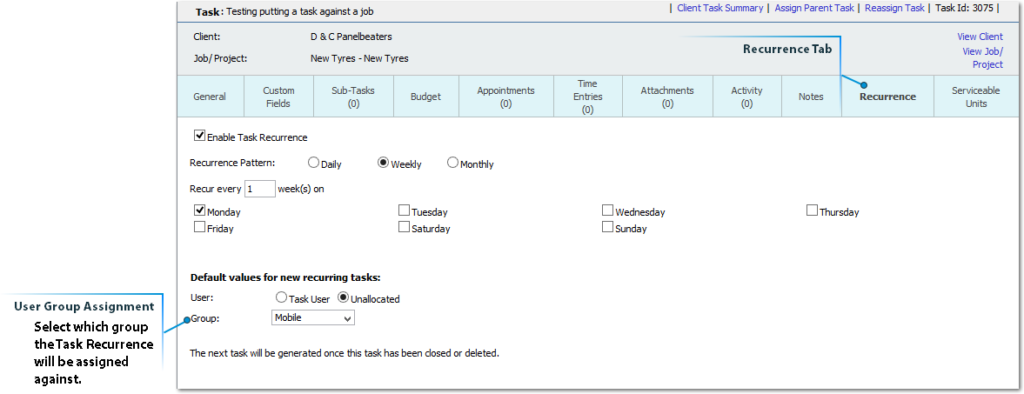
Task recurrence is a feature that has been in TimeTrak Professional for a while but recently the ability to assign the recurring Task to a specific user group has been added.
The purpose of this is so that the next creation of a Task can be reported upon by group.
A working example of this is where recurring tasks are assigned to Unallocated and some will be to the group ‘Service Technicians’ and some could go to a group called ‘Sales Team’.
Client Portal Task Grid Update
With the Client Portal Task Grid update we have altered the TimeTrak Admin Console add in for the Client Portal.
Fields to show in the Client Portal can be selected and ordered now. Log into the TimeTrak Admin Console
Go to the Client Login Settings

Within the Customer Groups Tab select a Group, click on the ‘Task Grid Layout’ button to assign and order the task fields.

Billable Status Update
We have a new Graphical Reporting Tool for Billable Time verses Budget.
Within TimeTrak Professional there is a graph showing the users Billable Time in comparison to the budgeted value.

Users can double click on that report to save to PDF, run against user groups and date ranges.

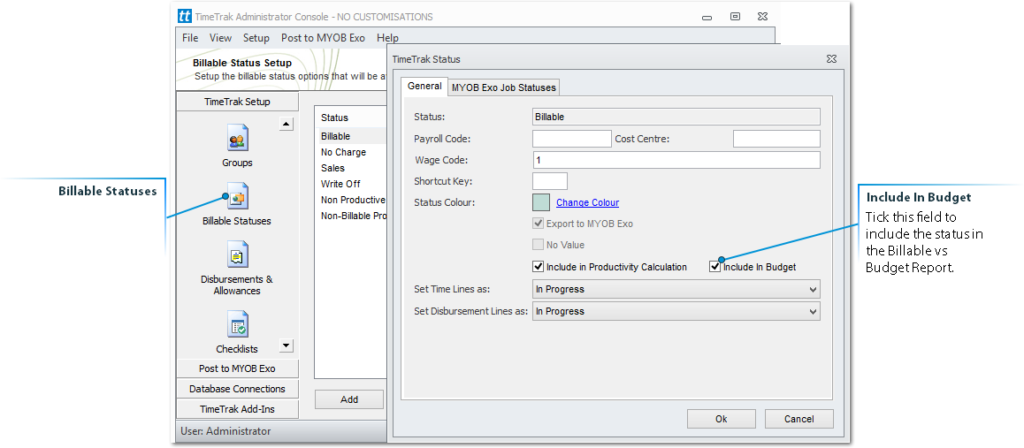
Within the TimeTrak Admin Console, against the Billable Statuses, there is now the option to choose which statuses will be added into this calculations for the Billable vs Budget Report.
Disbursement Update
Now in TimeTrak users can be set up with visibility to edit the cost value of a Stock Item (Disbursements). The visibility setting is found within TimeTrak Admin Console, in the Profile settings, on the Mobile Tab. Now there is a field ‘Cost Price’ and this can be set to Hidden, Toggle or Always.

User Update
This feature adds a field to the user which captures the users start date. Within the TimeTrak Admin Console, in the Users menu, drill into a User.
On the User Settings tab the Start Date can be updated but will default to the day the user is set up in TimeTrak.

Add from Job Quote Lines
Against the Profile settings in TimeTrak Admin Console, in the MYOB Exo tab, the ‘Show Job Quote Lines’ setting can be enabled.
Once this is enabled the line options become visible and the option to ‘Update Actual Quantities Used’ also becomes available.

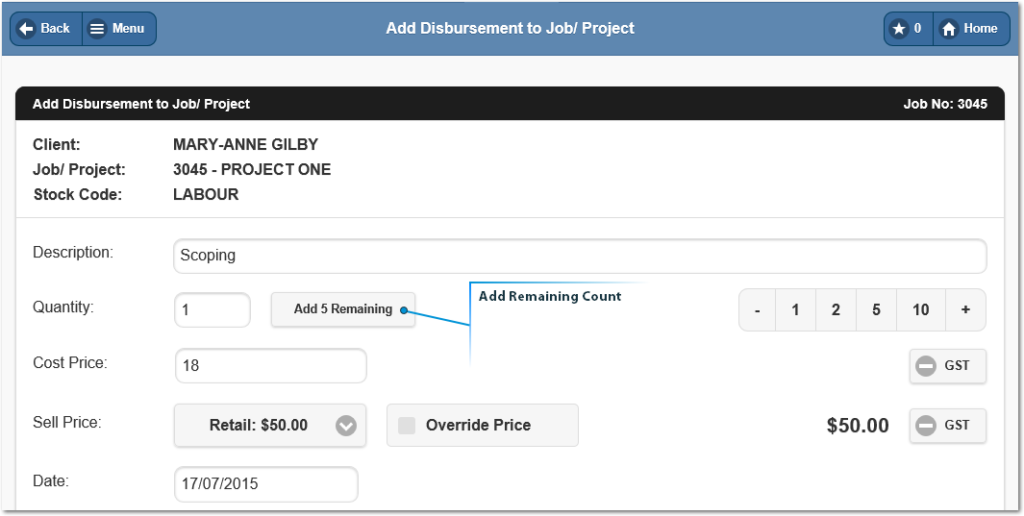
Once this is set up in the Profile then within TimeTrak Mobile, users can view and if set up ‘consume’ the stock listed in the quote lines.
This function is fantastic if the job is quoted and itemised, or it is something that is built onsite and the user needs to know what materials to use.

When adding in a line, users can select the Quantity used or use the remaining quantity off the Quote Lines.
Appointment Status and Category
Against Appointments, Statuses and Categories can be set up.
Within the TimeTrak Admin Console, Profile settings, in the Config Tab the Appointment Statuses and Categories can be enabled.
Status Set Up Example

Category Set Up Example

In TimeTrak Professional when creating an appointment the status and category can be selected.

Within Mobile the Appointment will display the colours of the status

Support
If you have any questions or concerns please contact a team member at Focus by either emailing support@exosoft.net.nz
or for urgent support please email and then call
NZ – 0800 12 00 99
Australia – 1800 60 80 77