Table of Contents:
1. Introduction
2. Setup Checklist Report
3. Types of Checklists
4. Create a Checklist
5. Add Checklist to TimeTrak User Profile
6. Extra Options in Checklists
7. Checklist Items
8. Checklist Item Options
9. Email Checklists
10. Copy Options in Checklists
11. Checklist Report Settings
12. Standard Narration in a Checklist
13. Checklists against Tasks
14. Checklist Tab in TimeTrak Professional
1. Introduction
Checklists are tools that use to better organise your assignments and to verify the most important tasks. Furthermore, checklists are designed to reduce errors and ensure consistency and completeness. TimeTrak is facilitated with creating checklists and attach them to various stages of Job, Task, Appointment or Time Entries.
To create a Checklist in TimeTrak, we recommend reviewing your company’s established, paper-based checklist(s)/forms. Using these, you can add the fields that you would like to replicate to your TimeTrak Checklist.
Example Checklists:
- Health and Safety (JSA) Checklists – These type of checklists usually have questions about site safety and photos of any identified issues including technicians sign off. Upon completion, they are shared or emailed to both internal and external stakeholders.
- Service Checklists – These type of checklists usually includes a list of things that need to be ticked off and checked. They can be reminder/acknowledgment type questions. These are often for internal use.
- Maintenance Checklists – Another list of things to be done checklist but more formal and often sent out externally. Often has the Client and Technicians signature to show work has completed.
- Certificates – These checklists can be used to produce a Certificate that an organisation might produce. They will often pull data from the Serviceable Unit worked on, or stock item, and have notes on compliance. These are usually sent both internally and externally.
- Notices – These type of checklists are used internally and are to let company staff know that something needs to be done or for their information. Examples are moving a job to a new status or creating and assigning a Serviceable Unit.
Additionally, anything that could be repeated in each Checklist or pulled from the databases (Exo and TimeTrak) can be added to the checklist. As an example, if the tech staff selects a Serviceable Unit, serial no or any other fields that relevant to the Job/Task can be pulled through to the checklist.
TimeTrak requires few steps for checklist creation. Next sections in this document explain key stages of the process.
2. Setup Checklist Report
A Checklist Report is a primary pre-requisite for the Checklist creation process. TimeTrak has a standard Checklist Report. During the first import, this report will need to be updated with your organisation’s logo.
Browse the Reports menu to ensure a standard checklist is available.
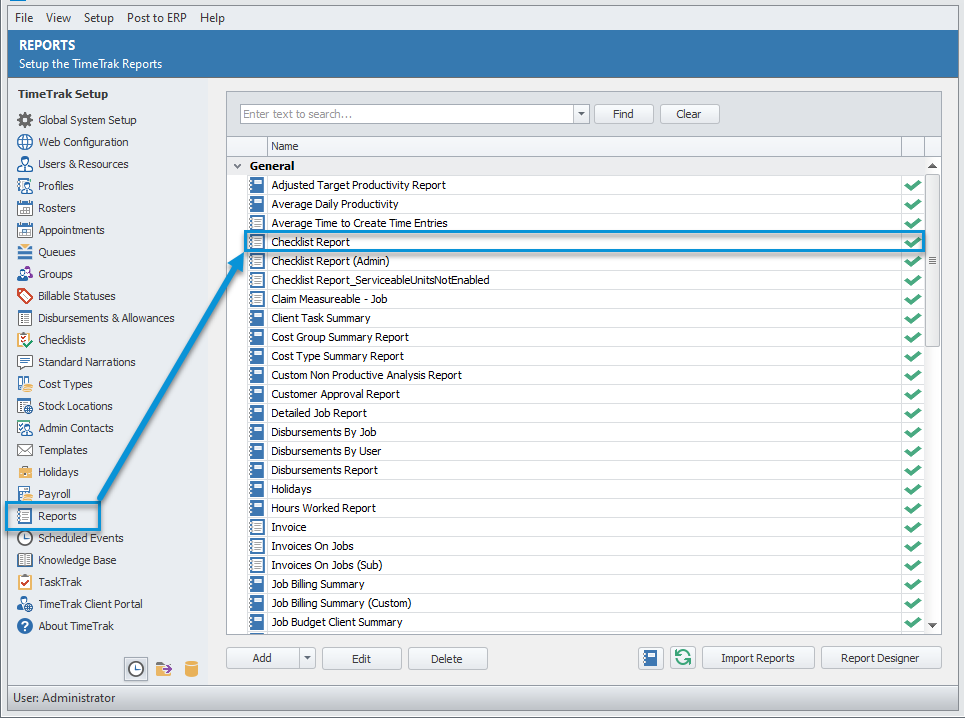
If there is no Checklist Report, then the ‘out of the box’ Checklist Report can be added via the Import Reports button.
Tick on the Checklist Report (https://timetrak.benandhayley.nz/reports/checklist-report/) or Checklist Report_ServiceableUnitsNotEnabled (https://timetrak.benandhayley.nz/reports/checklist-report-serviceable-units-not-enabled/) as per the below screen.
Set the Category to General and click OK to import it.
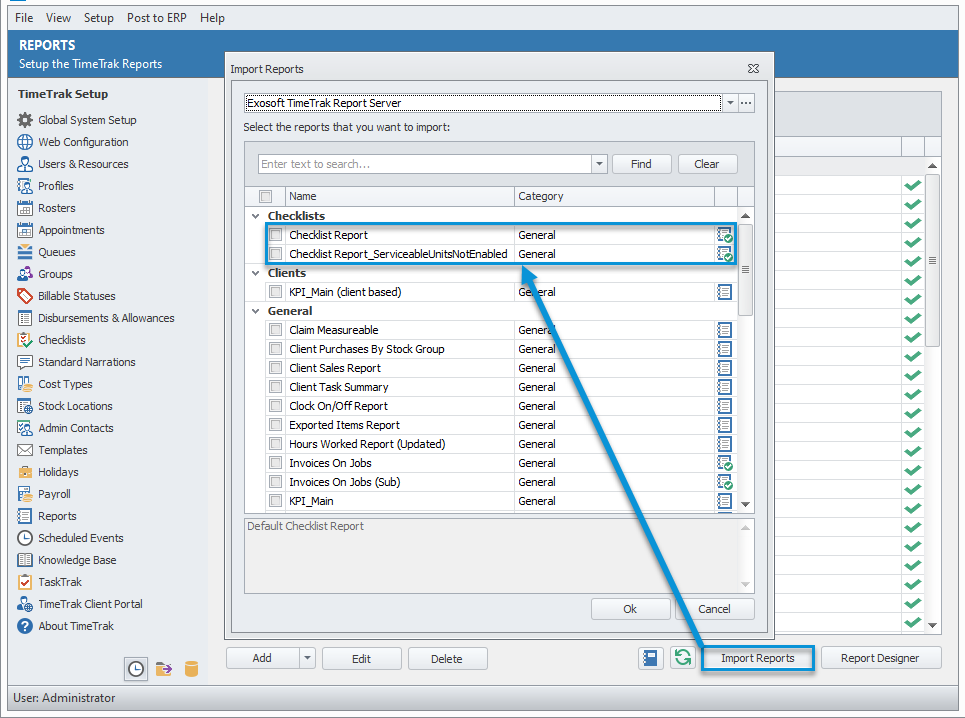
NOTE: If the database does not have Serviceable Units enabled, ensure the Checklist Report_ServiceableUnitsNotEnabled is imported and used otherwise there will be errors upon saving the checklist due to the database table/ views not being available.
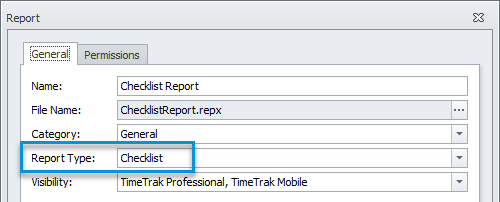
Return to the Reports main screen and double click on the new Checklist Report to edit the General settings and Permissions tabs.
Set appropriate Report Type as Checklist.
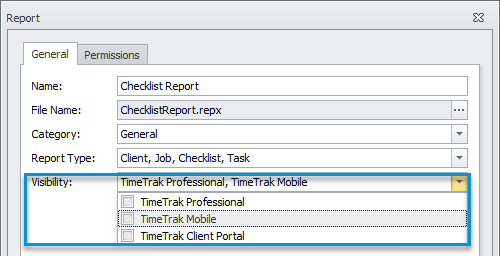
To make the report visible for TimeTrak Mobile user, enable TimeTrak Mobile in Visibility option.
In the Permissions tab, tick on the profiles who can see the Checklist Report or Select All.
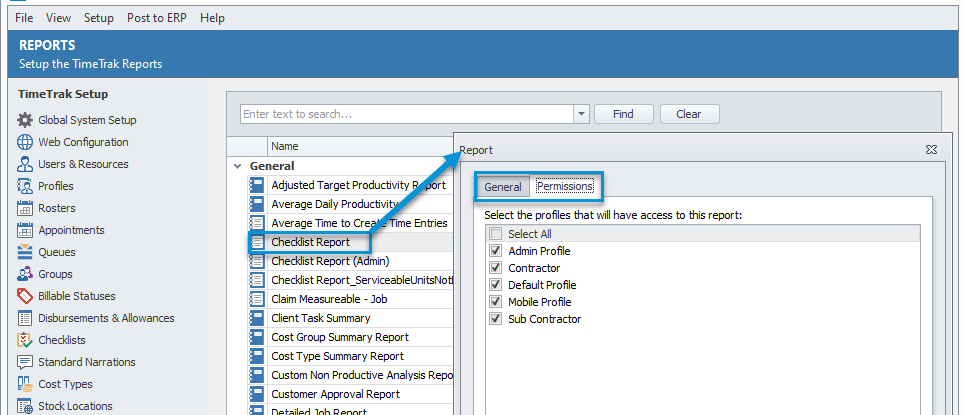
NOTE: If updating the checklist with a client’s logo or other data, it is recommended that the checklist report is saved under a different name to the database and that this copy is used. Making alterations to the out of the box checklist report without saving it, could cause your changes to be lost if this checklist report is updated.
3. Types of Checklists
There are three types of Checklists in TimeTrak version 21.1.
Standard Checklist is a full Checklist and has all of the options of having a report assigned against it.
Partial Checklist cannot have a report assigned against it, but once it is created, it can be used more than once, in more than one checklist. As an example; Partial checklist is having one for client and technician sign off and adding it into the bottom of every Standard Checklist.
Checklist Home Page is a landing page where multiple Standard checklist’s can be added proving a central location where field staff can select the appropriate checklist without ALL partials needing to be loading which can cause performance issues.
Checklist Home Page is a landing page where multiple Standard checklist’s can be added proving a central location where field staff can select the appropriate checklist without ALL partials needing to be loading which can cause performance issues.
For more detail on Checklist Home Page Checklists see below:
https://timetrak.benandhayley.nz/blog/category/timetrak-21-1-release-notes-whats-new/#Checklist-Home-Page
4.Create a Checklist
Log in to the Admin Console and Click on the Checklists menu item.
Click on Add and select Add Standard Checklist or Partial Checklist.
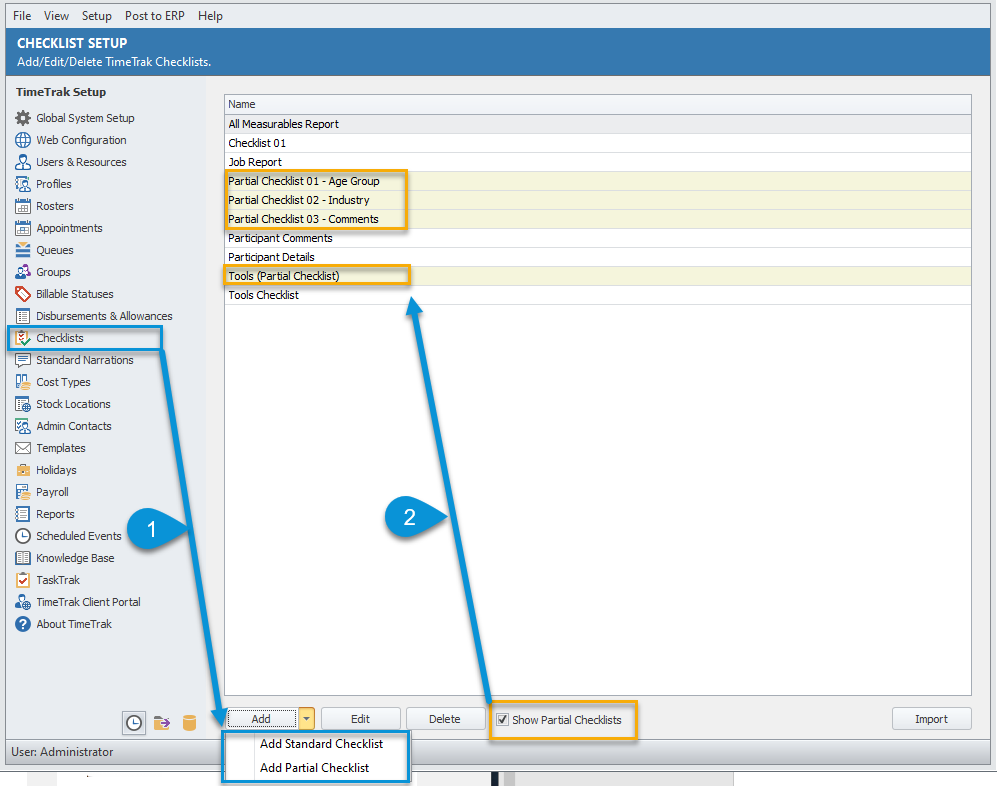
Once added Standard checklists would display on the checklist grid as per no 1 in the above screenshot. Select Show Partial Checklist as per item 2.
Once Add Standard Checklist is selected, the new Checklist screen will come up.
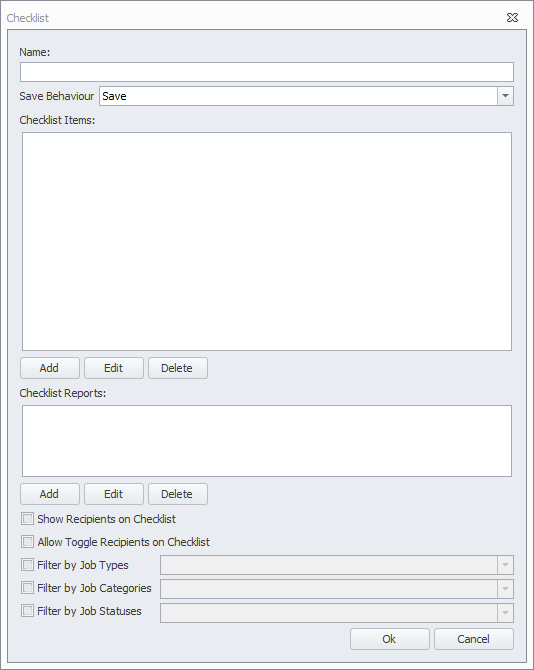
Give the Checklist a meaningful Name, as this name will be displayed on TimeTrak Mobile website.
Choose Save Behaviour.

- Save – this will save and email the Checklist straight away
- Save as Draft + Save – this will allow the user to Save the Checklist in a draft, and once it is completed, they can save and email the Checklist. This behaviour is beneficial if the checklist is used by multiple users, so they don’t have to fill the same checklist for one job.
- Save Draft + Delete Draft + Save – this allows the user to Save the Checklist in a draft and delete the Draft if it is not to be sent, then save and email the Checklist.
- From version 19.3 the ability for mobile users to view all their draft checklists via the home screen was added to TimeTrak Mobile.
From the home screen users select Profile, select My Draft Checklists under home screen configuration then select Return to Home Screen, where they can see a My Draft Checklists with a count as per below:

On selection of My Draft Checklists users can see a list of their outstanding draft checklists where they select and complete.

Add the Checklist Report.
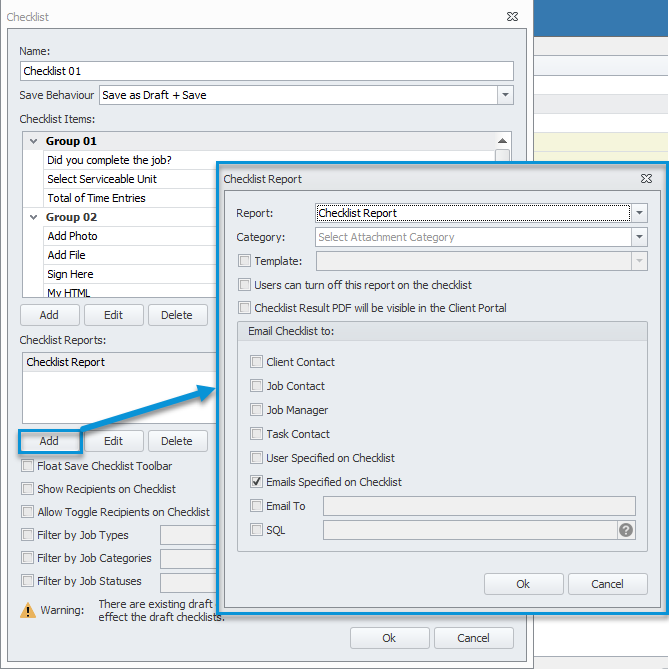
NOTE: When a Checklist Report is allocated to a Checklist, there are settings about the report that need to be considered.
- Category – Set the Category to Checklists
- Template – If there is a custom email template then it can be selected here if nothing is selected it will use the default email template.
Click OK to save the Checklist.
5.Add Checklist to TimeTrak User Profile
Once the checklist is created, it is essential to make it visible for the TimeTrak user. This is configurable in TimeTrak Profile level. Add the Checklist against the Profile as per below steps.
Open the profile(s) you want to enable the checklist against, and go to the checklist tab. In the left panel, you will find all the standard checklists that are created. Tick on the Checklists that need to be visible against the Job.
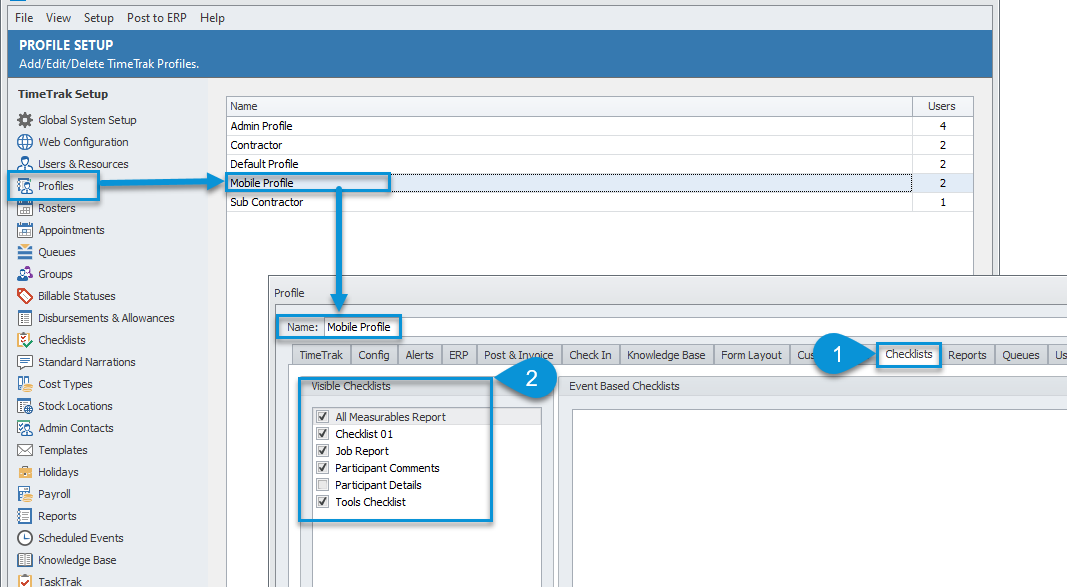
Event-Based Checklists are located in the right panel of Admin Console > Profiles > Checklists. Event Base Checklist options include:
- After Start Travelling
- After Check-In
- Before Check Out
- After Add Time Entry
- After Add Disbursement
- After Task Completed
- Before Post
- On Suspend
- After Add Client
- After Add Job
- After Add Appointment
- After Add Serviceable Unit
- After Add Task
- After Check Out
- After Commit Measures
These options will bring up a Checklist immediately when the event occurs. As an example, if TimeTrak Mobile user is required to complete Checklist 01 after adding a Time Entry. In an event-based checklist, it will be prompted to complete the Checklist that is assigned to this event against their profile.
From version 20.1 the Menu and back button no longer appear within an event based checklist to prevent users from not completing an event based checklist.

Note: Checklist events will only fire once every 24 hours for the same user/ job as per below:
https://timetrak.benandhayley.nz/blog/category/changes-to-checklist-behavior-the-same-checklist-will-not-pop-for-the-same-user-job-within-a-24-hour-period/
The completed checklist will be saved as PDF under attachments against the job. Check our Tip of the Week: Viewing TimeTrak Checklist Attachment Files for more information.
Similarly, TimeTrak can create multiple event-based checklists to pop-up on TimeTrak Mobile one after the other upon check out of a job. Check our Tip of the Week: Multiple Checkout Checklists for more details.
Select Add button on the bottom right corner of the screen and choose an event where the checklist will be prompted.

In an event-based checklist, if the user suspends the job for lunch and checks back in, the checklist will not be prompted to complete the check-in checklist again.
NOTE 01: In some scenarios, when running the event-based checklist that might not have the required information to time spent on a job or task. As an example, if a Checklist runs on the event of After Check-In – the report will not display the time that the user spent on the job/task as they have not yet finished.
NOTE 02: If you want the checklist to be saved as a draft, the checklist must be ticked on to make visible in TimeTrak Mobile. If the checklist hasn’t been made a “Visible Checklist” and the checklist is the only event-based, users are still able to save as draft, but they can’t access the draft unless the checklist is made “visible” against their profile.
TimeTrak Checklists have additional configurations. Below list describes each option based on highlighted area of the Checklist screen.
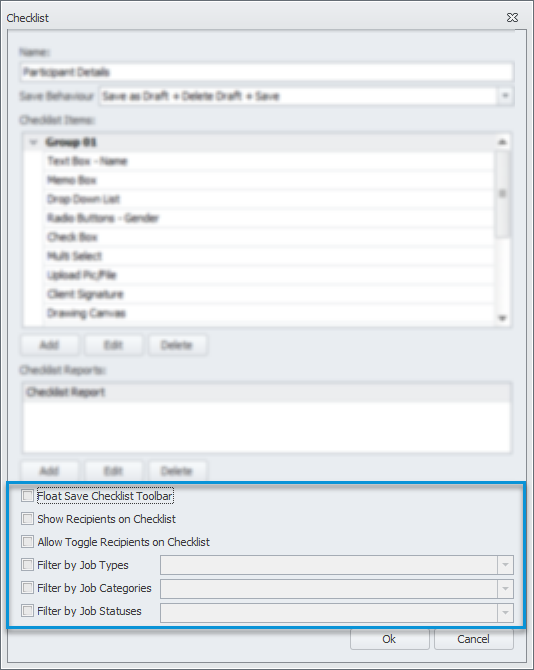
- Float Save Checklist Toolbar – This will show floating checklist toolbar in TimeTrak Mobile and allows the user to select Save as Draft or Save and Complete the checklist without having to scroll to end of the checklist.
- Show Recipients on Checklist – This will list all of the users’ email addresses, which are ticked on or manually entered at the Checklist Report level.
- Allow Toggle Recipients on Checklist – This will allow the Mobile user to tick users on and off when the Checklist is being emailed on completion.
- Filter by Job Types – Select one or more job types the checklist is visible for. This setting is very useful if particular checklists only apply to certain job types and not others.
- Filter by Job Categories – Select one or more job categories the checklist is visible for. This setting is very useful if particular checklists only apply to certain job categories and not others.
- Filter by Job Statuses – Select one or more job statuses the checklist is visible for. This setting is handy if particular checklists only apply to specific job statuses and not others.
- CSS – There is the ability to add a CSS Class to each checklist, checklist group as well as each individual checklist item.
CSS stands for cascading style sheet and a basic knowledge of this is required to use this feature.
Populating these fields against a checklist provides the ability to display the checklist items in a different colour for example to make the item stand out to the mobile user whilst he is completing the checklist.
The CSS Class will have no impact on the checklist report it will only impact the way the checklist is displayed to the mobile user whilst they are completing it.
7.Checklist Items
In TimeTrak, there are different checklist items that can be configured based on your business requirements.
From version 19.3 basic descriptions were added to checklist items in order to assist end users with checklist creation.

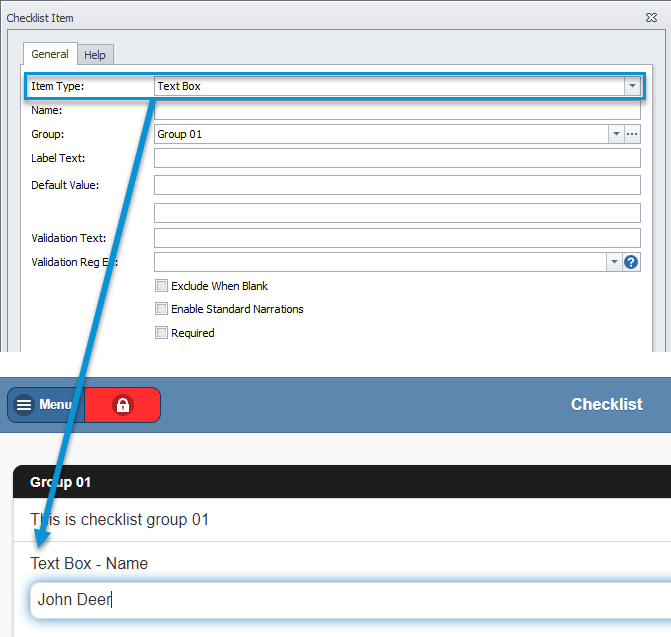
Text Box: The text box shows as a single line in the Checklist and users add in a small sentence or single word response.
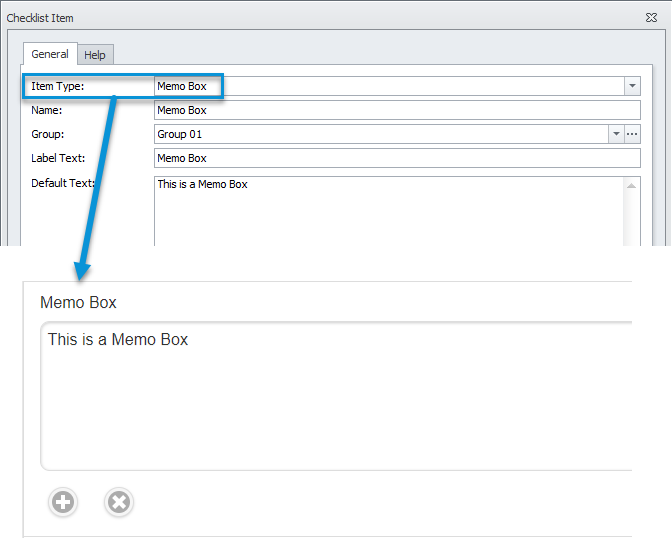
Memo Box: This is a larger box for text and usually contains long explanations.
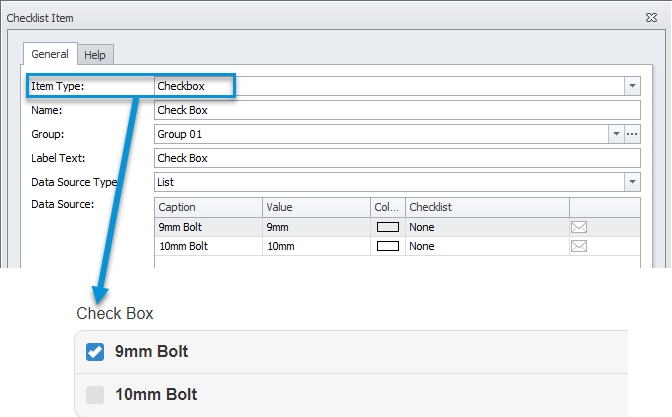
Check Box: This is a Boolean behind the scenes and is looking for a 0 or 1 answer. The options of data could be Y and N or Yes and No, 0 and 1. This displays as a tick box in the Checklist.
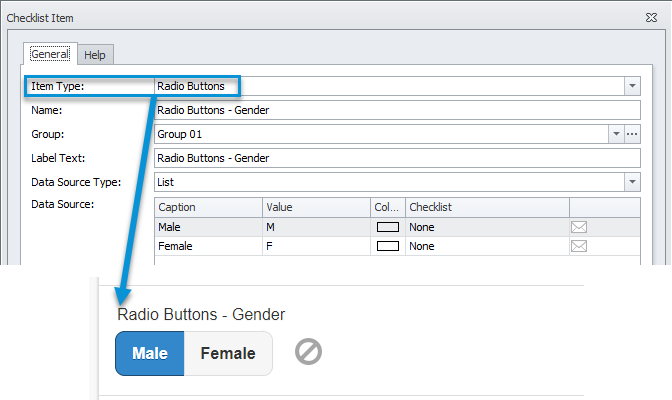
Radio Buttons: These show as a button with text in it and they can be built on a SQL query that allows the user to select a single item or it can be a manually entered list, which can be linked to a Partial Checklist.
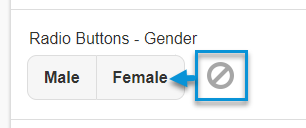
There is a clear icon beside radio buttons which allows users to clear their selection If they incorrectly selected a radio button.
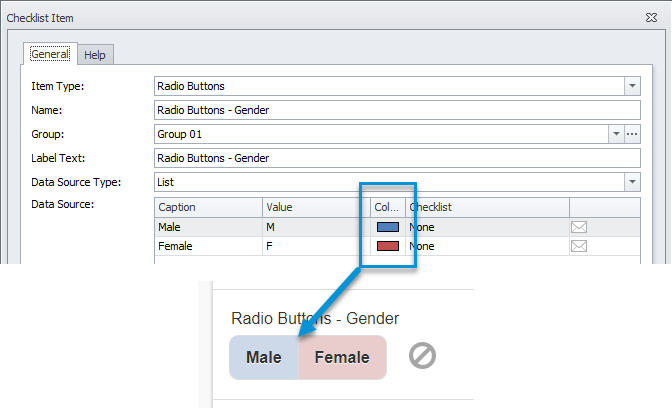
Checklist Radio buttons can be configured with colours.
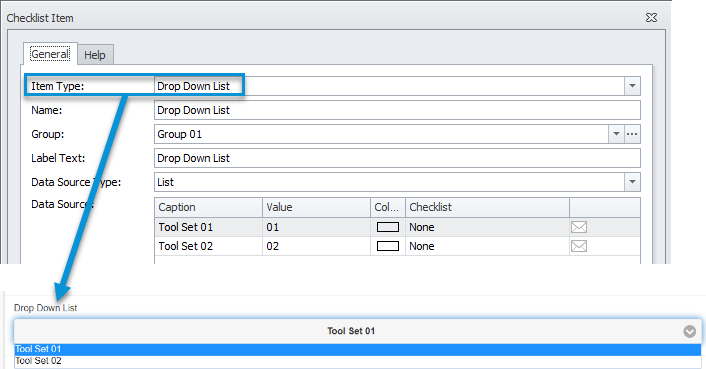
Drop Down List: This has the option of being a SQL query that allows users to select one item from a drop-down list or a manually entered list, which can be linked to a Partial Checklist. This shows as a single line with a down arrow for the user to click on and expand the list.
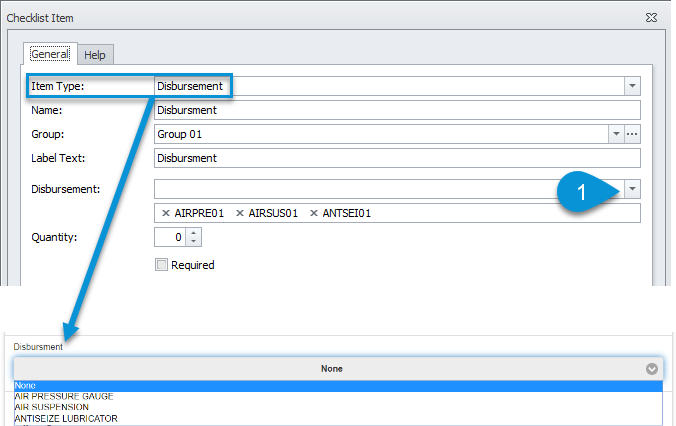
Disbursement: This will show as a line with the Stockcode visible and its sell price. If a user adds a disbursement in a Checklist this will assign the Stock to the Job, the Checklist is related to, and remove it from the stock count. The number and item you put in the checklist will be shown the same in TimeTrak Mobile while the quantity can be edited, the item can’t.
Note: to add more items to the list, select disbursements from drop-down list as per item 1 in below screenshot.
You can populate a default value of items in the quantity field also.
https://timetrak.benandhayley.nz/blog/category/tip-multiple-disbursements-on-checklist-items/
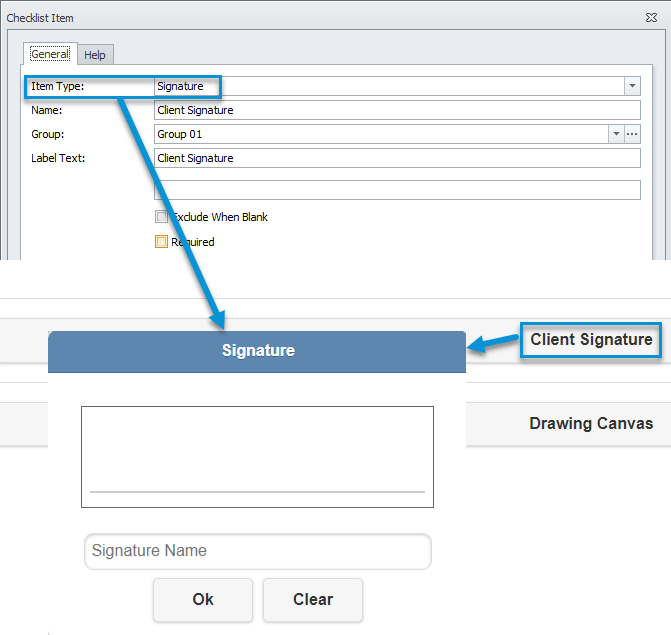
Signature: A signature displays as a pop-up box with a blank space to capture a signature and a name field.
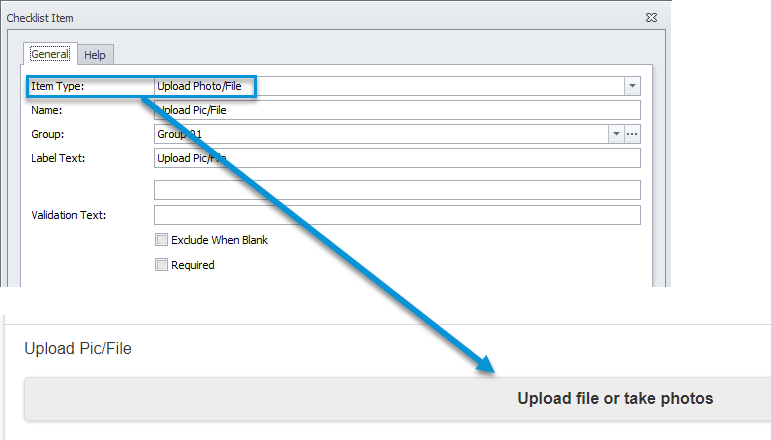
Upload Photo/File: This is a browse option in the Checklist that allows the user to search the devices local storage for a file or photo. Alternatively, they could take a photo and upload that.
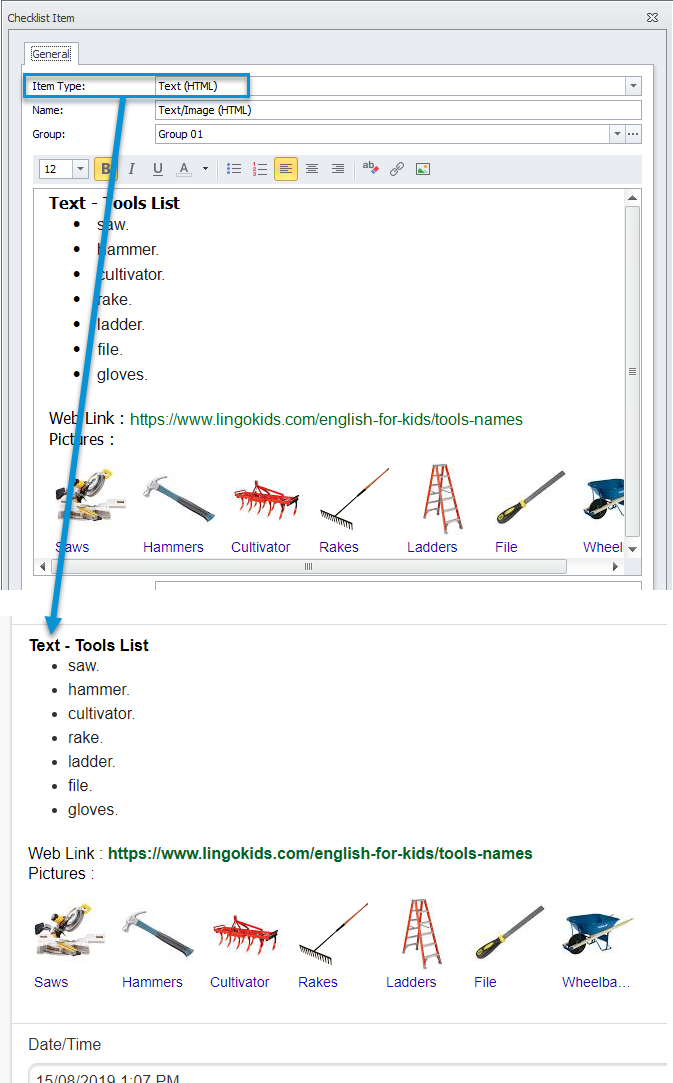
Text (HTML): This item type has an ability to display text, pictures or web links. This item type has an ability to view images within a checklist provides text, visual information and web link to the TimeTrak Mobile user when completing a checklist.
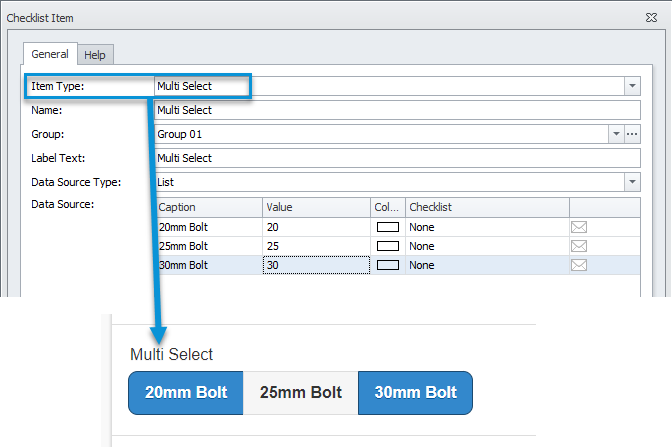
Multi-Select: This is a row of buttons with text in them and more than one can be selected. They can be a SQL query that allows the user to choose either a single item or multiple items. It can also be a manually entered list, which can be linked to a Partial Checklist.
Job History Note & Client History Note: This displays in the Checklist like the Memo Box – where a note can be added. Job history note creates a history note back against the Job in Job Costing and Client history note will create a note in the respective client of the job.


Serviceable Unit: This will show the Serviceable Unit’s name in a drop-down list, and the user can select one from any that are currently assigned to the Job from which the Checklist is being run against.
If a serviceable unit was selected within a checklist, the checklist report will be not only saved against the job but also the serviceable unit.
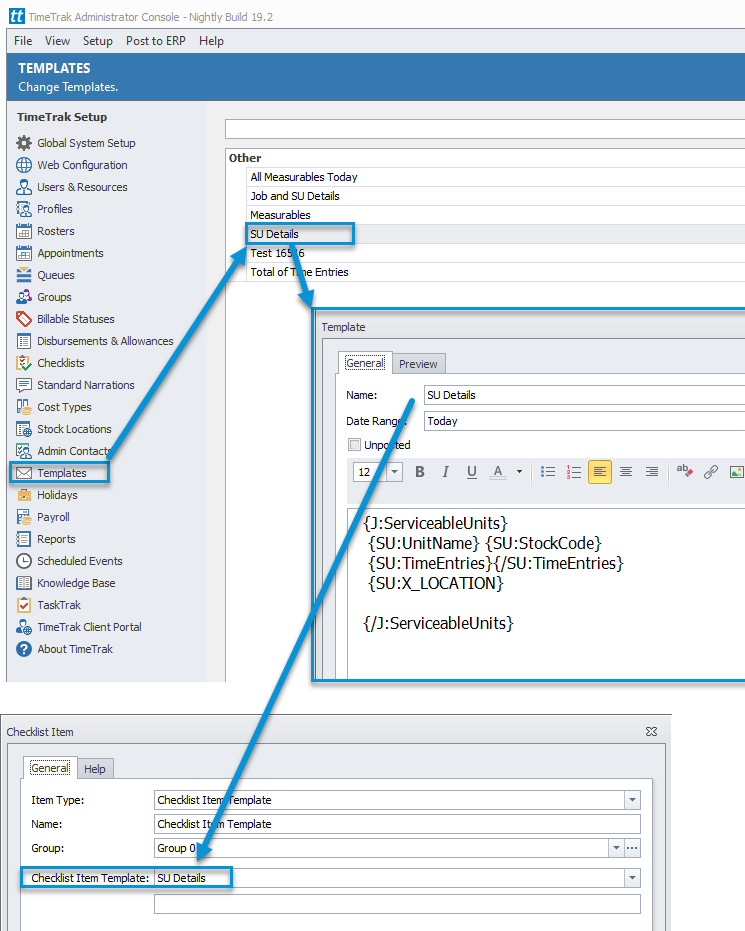
If a Checklist Item template exists this can be selected, when the checklist item template is formatted to display details about the serviceable unit this will display details about the selected item on screen to the mobile user and flow through to the checklist report.
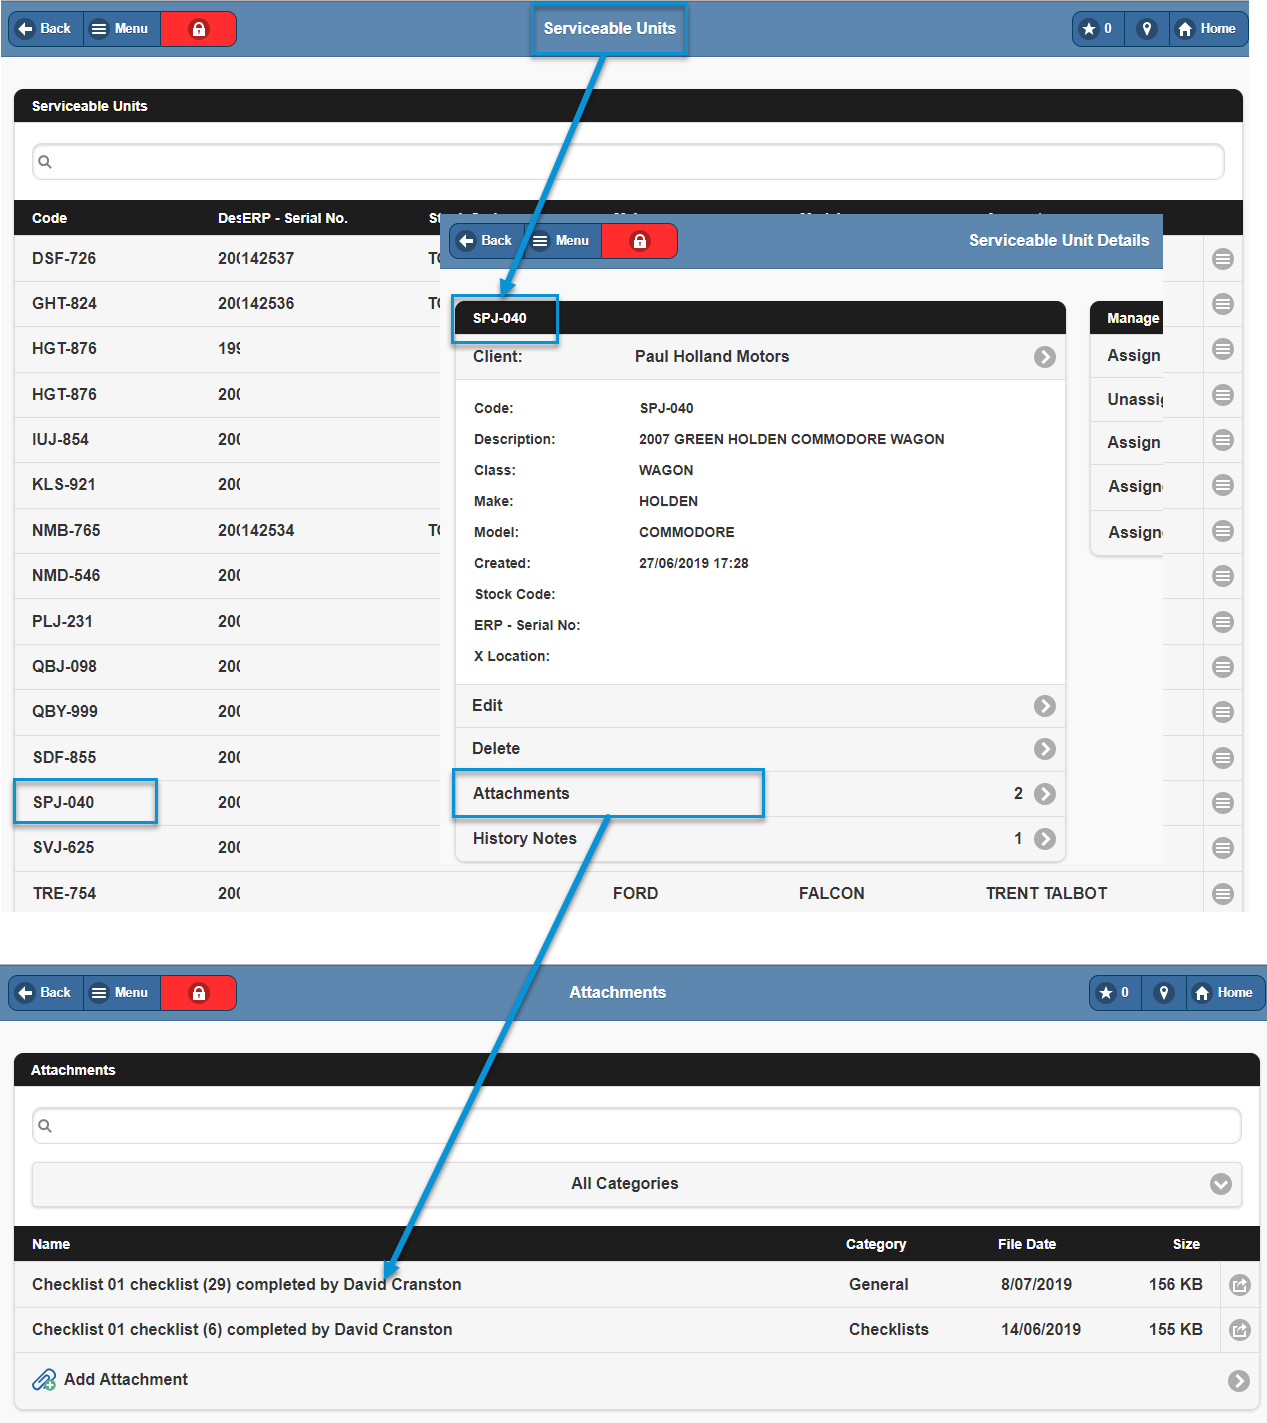
This provides the ability to review a “service history” via checklist forms directly from the serviceable unit attachments instead of working through jobs the unit has been assigned to.
To enable this feature, add Checklist Item and select Item Type; Serviceable Unit as per below:
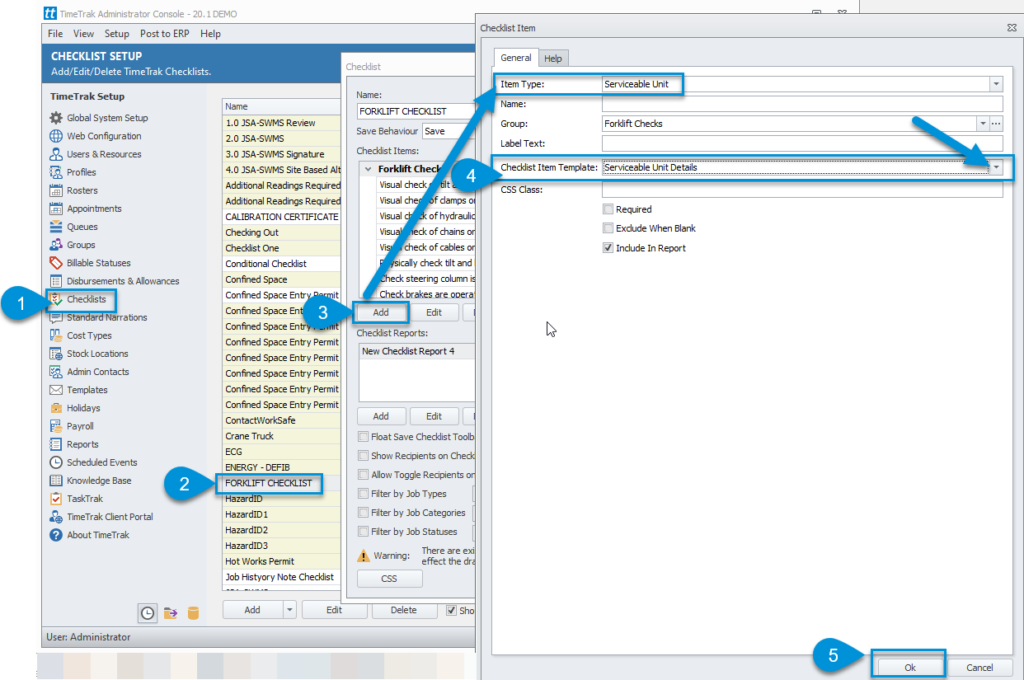
On save of the checklist the PDF will be saved against the job it was generated from as well as the serviceable unit that was selected via the serviceable unit checklist item type.

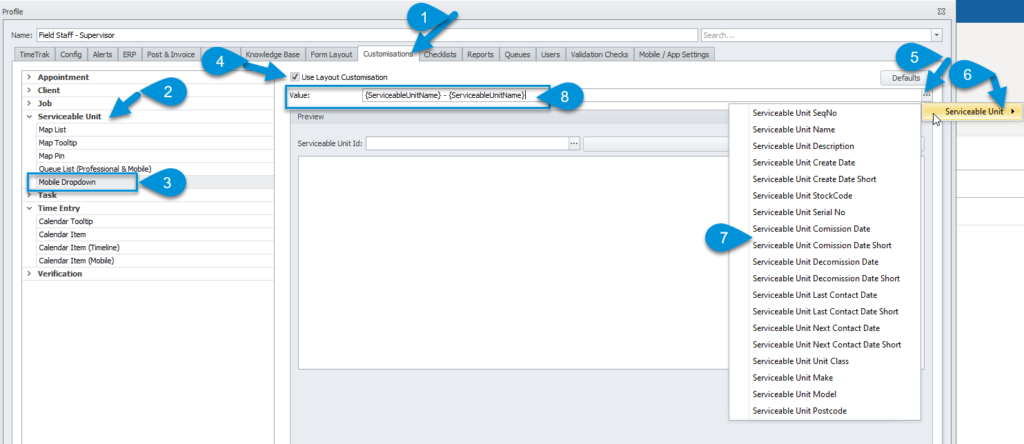
Details of the serviceable unit in the drop down list above (as well as serviceable unit selection against a time entry) can be customised against users profiles as per below in order for the selection to be more meaningful to field staff.
View Attachments in Serviceable Unit in Mobile or Professional. You are able to see checklist (pdf) as an attachment as per below.

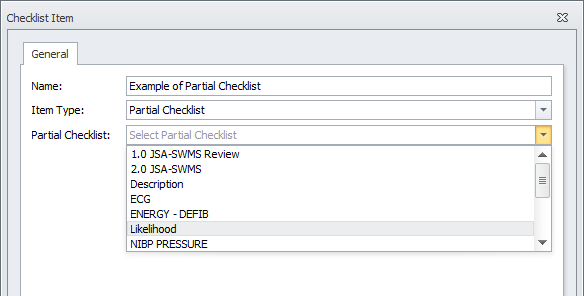
Partial Checklist: When you created a partial checklist, you can also put it on the body of the main checklist. It makes it easier when creating a new checklist, you don’t need to recreate part of checklist as you can put an existing partial checklist.
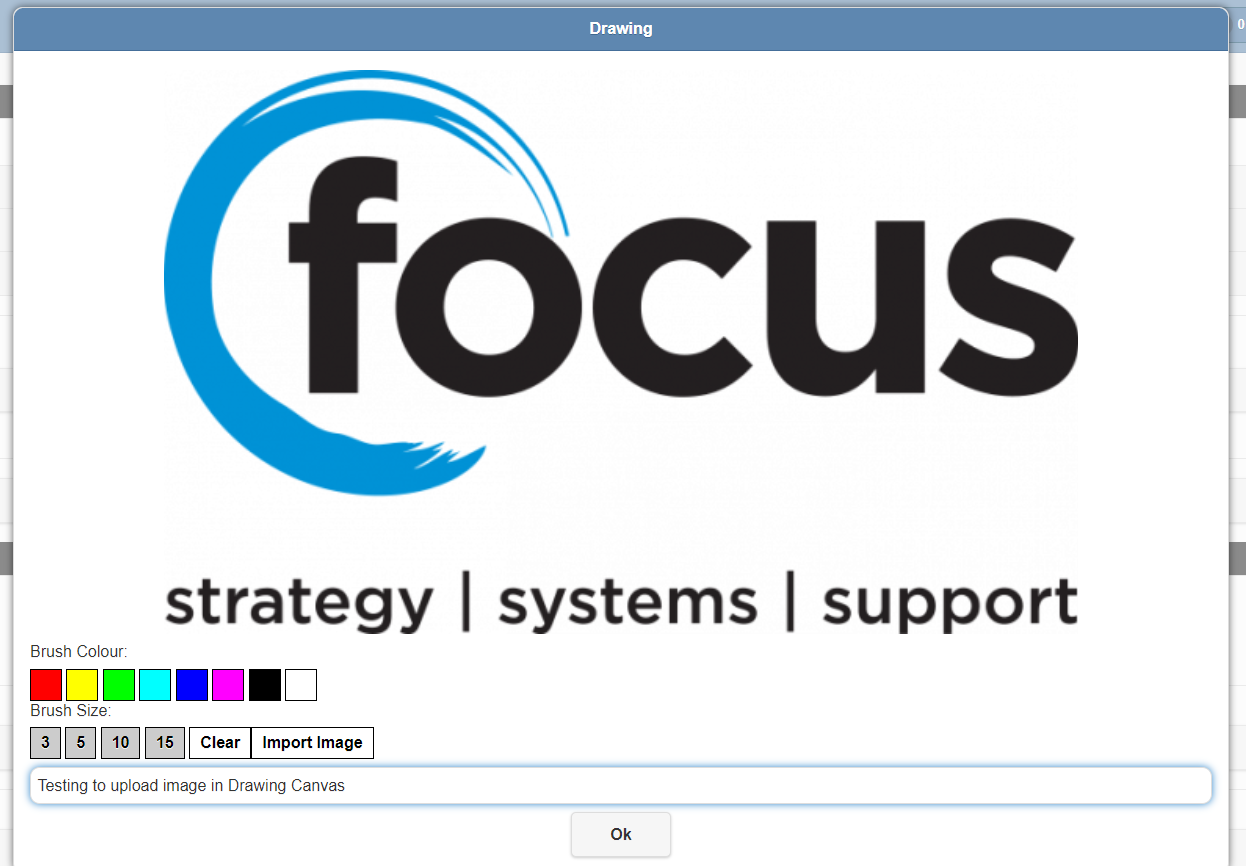
Drawing Canvas: This displays in a checklist as a button and when clicked on it opens up a screen, which is large enough for the user to draw a picture on. From the Drawing Canvas, the user can also upload a photo into it (like the file) but it has the added functionality of being able to write or draw over the photo. An excellent example of this is taking a photo of a site hazard and highlighting it before saving the image.
DateTime: This is a date picker option and allows the user to select a date within the Checklist.

Checklist Item Template: This displays information specified in a template. Check our Whitepaper: Checklist Item Templates for more details.
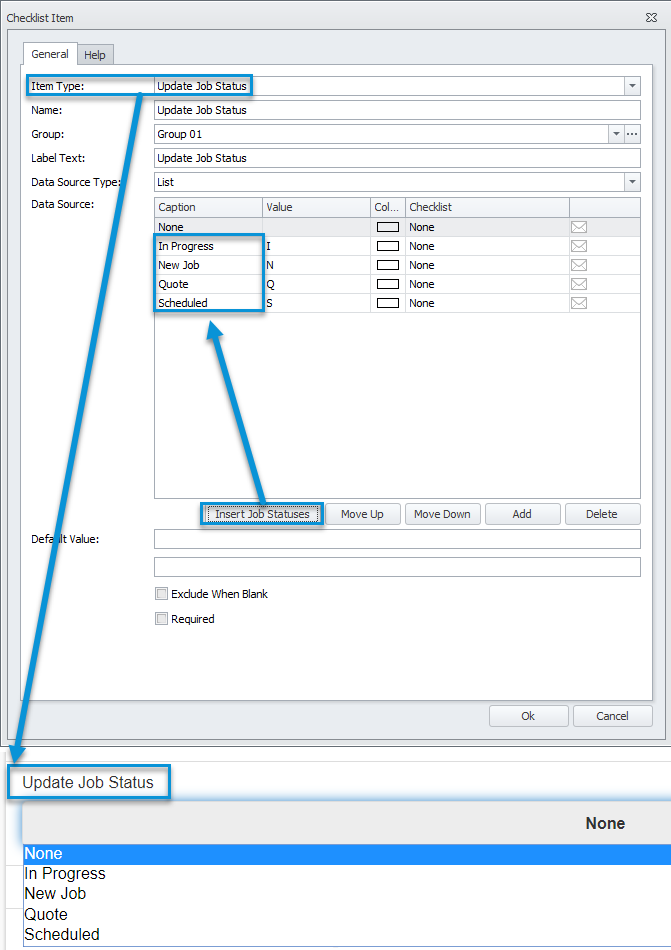
Update Job Status: This item type will provide an ability to change job status through the checklist.
Insert Job Statuses button will pull through all active job statuses as per below. It is important to note that Job Status will not be pulled through on to the Checklist Report.
Note: Job statuses can then be removed from this list to force users to update jobs to a certain job status on select criteria.
Checklist Status: Checklist Status is an additional checklist item available from version 19.3. Checklist status uses radio buttons in order for the field staff to set the status of the checklist which is then visible in TimeTrak Professional and can be updated by staff once an action is completed.
A working example of this checklist item is if a field user was completing variation work.
For example, onsite to repair a unit and whilst onsite had to complete another piece of work that requires customer sign off.
The field user could complete a checklist for the variation work and mark the checklist as “unapproved”.

The Default checklist statuses are Approved and Not Approved as per below:

Please note: If the checklist status is “Not Approved” then users are unable to “Save and Complete” the checklist. A checklist status of Not Approved can only be saved as a draft.
In Professional against the job, office staff can see the draft checklist and run the checklist report to review data as well as update the checklist status via run click functionality:

If the checklist statuses “Not Approved” and “Approved” are not applicable to your business processes, these can be customised by selecting List or SQL in the Data Source Type against the checklist item “Checklist Status”.
The default values are which prevent the ability to save and complete are as per below:
Approved = 1
Not Approved = 0
Therefore these could be renamed to something like below where “Requires Client Sign off” prevents the checklist being submitted and can only be saved as a draft.

8.Checklist Item Options
Against all checklist items, there are some general fields that are required or have the ability to provide end-users with additional information.
Help: You can add information to prompt against the checklist item as a help tip.
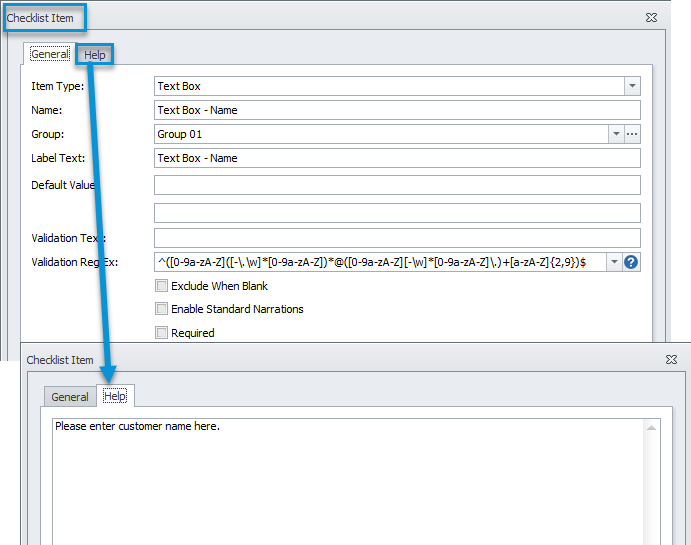
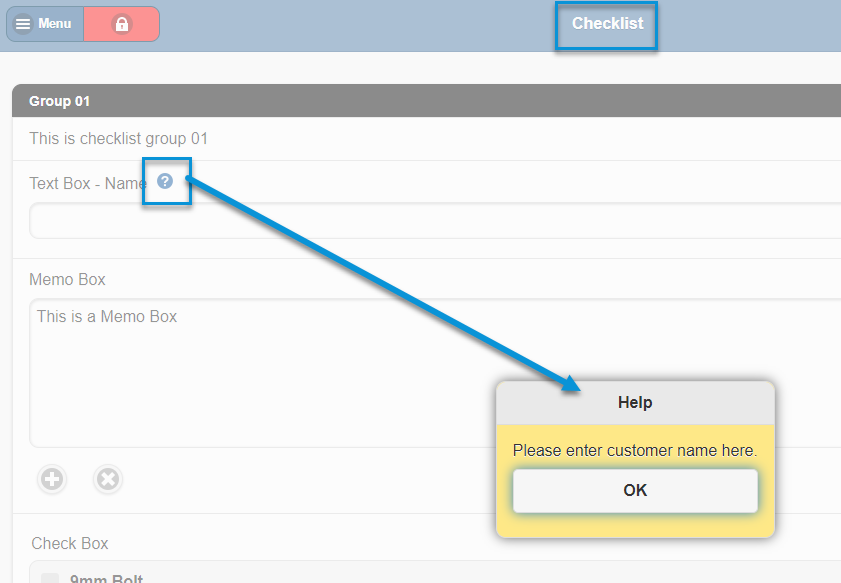
When information is populated in the help field, a question mark icon next to the checklist item is available in TimeTrak Mobile to end users as per below.
Checklist Groups: A Checklist group is to group Checklists items together and make Checklists easier to navigate and complete.
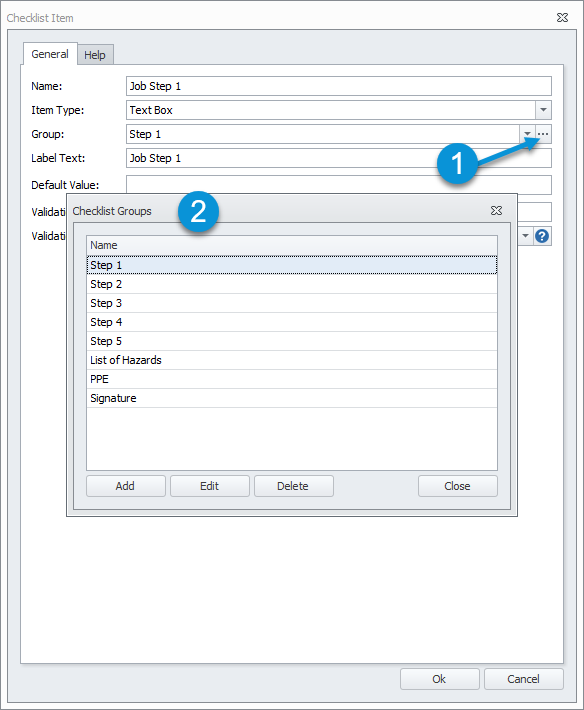
Every checklist item needs to be assigned to a Checklist group:
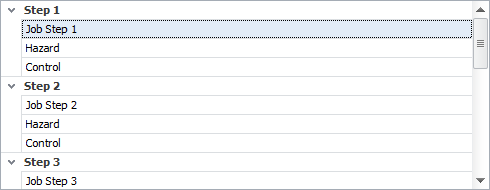
In TimeTrak Mobile, the Checklist groups display as a black bar as per below:
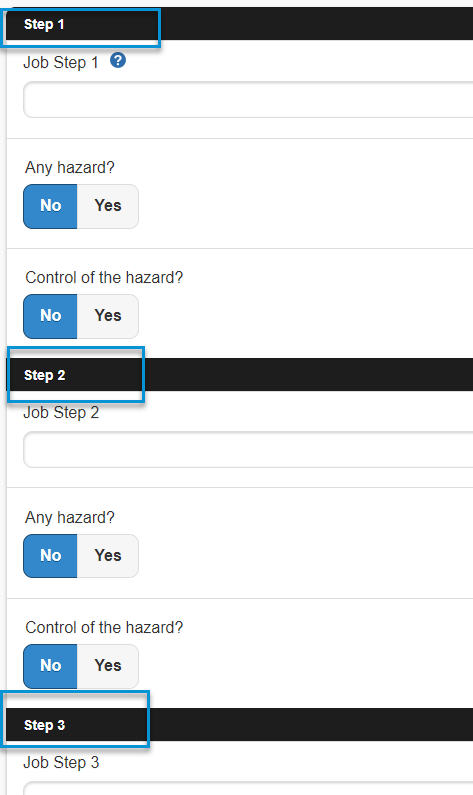
Checklists Groups display as headings on the out of the box Checklist reports by default.
However if the checklist group provides no meaning to the mobile user and you do not wish this to display in mobile Text Visible on Checklist can be disabled preventing the group name from displaying on the checklist report or TimeTrak Mobile.

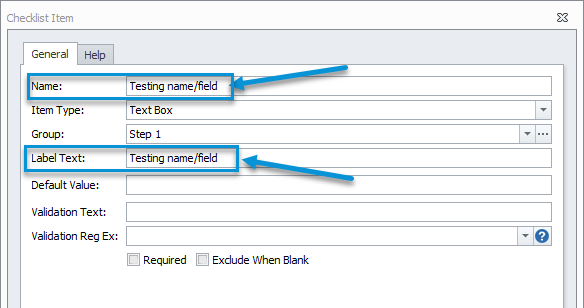
Name/Label Text: The name field is to identify the item in the Admin Console against the checklist. This information won’t be seen in the Checklist in Mobile or the report that is generated. On entering text into this field, the label text fields are automatically copied (as these are usually very similar).
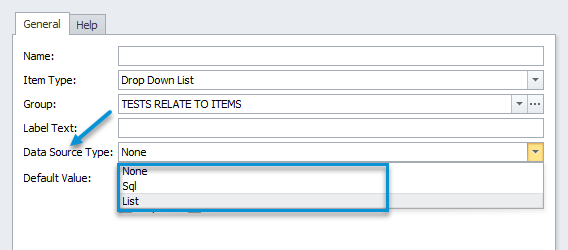
Data Source Type: When you choose the Checklist item type: Dropdown list, Radio Button, Checkbox, or Multi-Select, you will find an option for the data source. This is how the data for the item is produced. There is the option to populate this information manually via a list, or from the database via a SQL query.
SQL: With this data type, you must provide a SQL query where the first column is the value, and the second column is the name (value that will be displayed in the Checklist). For more information on the criteria of this SQL query, you can hover over the question mark.
A basic working example of this is if we need to list stock items that meet a certain stock group.
In the below example, we can populate the “STOCK_ITEM” Checklist item with the query: “SELECT STOCKCODE, DESCRIPTION FROM STOCK_ITEMS WHERE ISACTIVE = ‘Y’ AND STOCKGROUP = 14”
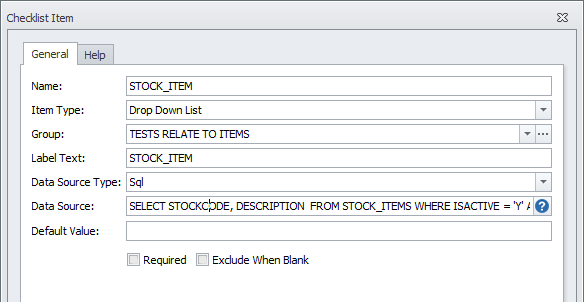
This will grab all the data from the database that matches the criteria.

Please note: No stock transaction will occur this is just a basic example of passing a SQL query into a Checklist item.
You can also pass the parameters JobId, ClientId, or TaskId into the query. To do this, click the question mark then the required parameter from the list as per below:
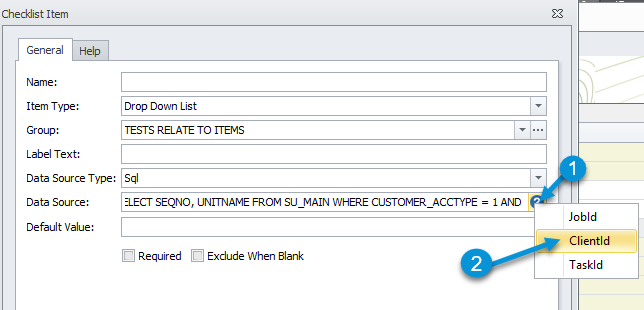
A working example of this is if you want to populate a list of Serviceable Units that are assigned to the CLIENT of the job you are working on.
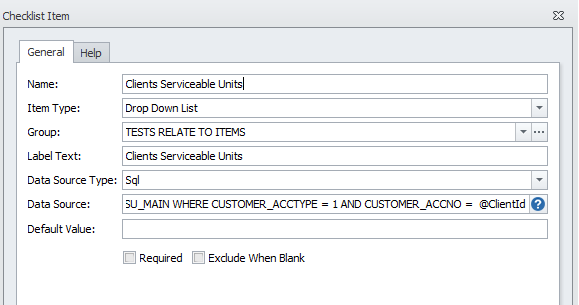
SELECT SEQNO, UNITNAME FROM SU_MAIN WHERE CUSTOMER_ACCTYPE = 1 AND CUSTOMER_ACCNO = @ClientId
This will display the results in the Checklist for the user to select as per below

List: In this data type, you can create the list manually.
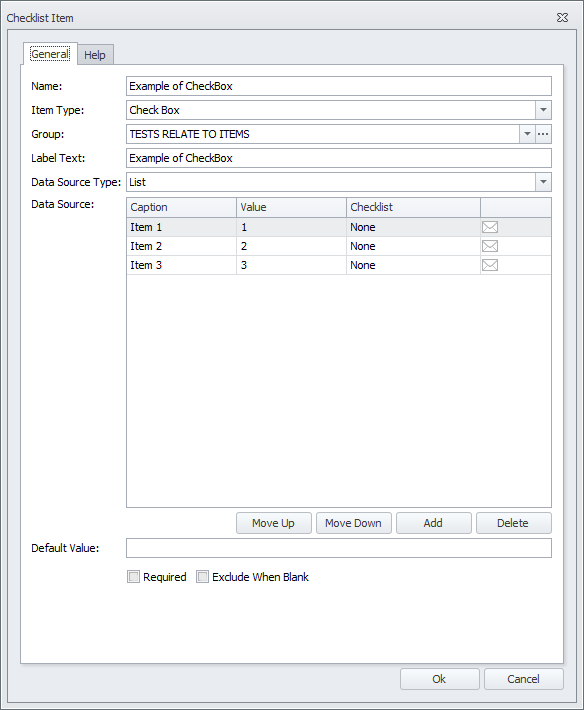
You can click “Add” to add items to the list, move up and down to arrange the position, and delete an item.
Caption: In the caption, this is the value that you will see in the checklist. Like the example above, you will see the items in the Checklist of “Example of Checkbox” are “Item 1”, “Item 2”, and “Item 3.”
Value: This column could be the same as the caption column, but the value in this column is what the database is populated with. In this example above, for “Item 1”, the value that we will see in the database is “1”.
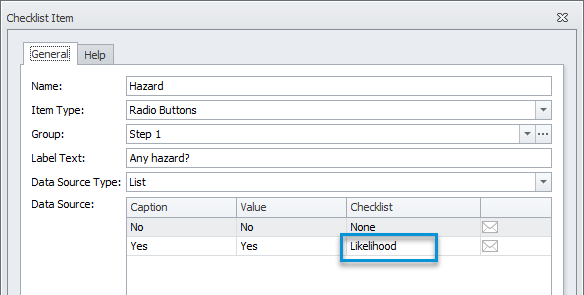
Checklist: By default, it will set “None”, but you can populate the checklist field with a partial Checklist. This means that you can specify a different list of questions based on the answer selected.
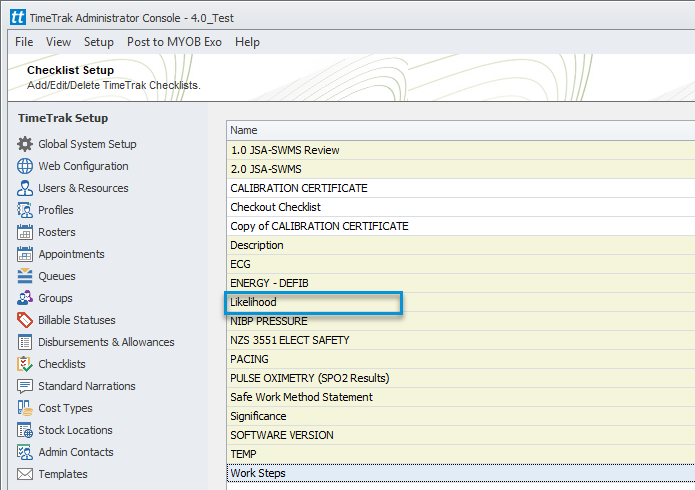
In the below example: If the user selects “Yes” to hazard they have to complete the likelihood Partial Checklist if they choose there is no Partial Checklist assigned, so they will move onto the next Checklist item in the Standard Checklist.
Default Value, Required, Exclude When Blank and Include In Report: At the bottom of this form, there is Default Value ‘Required’, ‘Exclude When Blank’ and ‘Include in Report’ settings.
The default value means that by default the option passed in here will be selected, preventing the Mobile user from choosing the option in the Checklist (and speeding up the process for them). In the example below, on loading the Checklist “No” will be selected, and the user would only be required to change this if that was not the case.
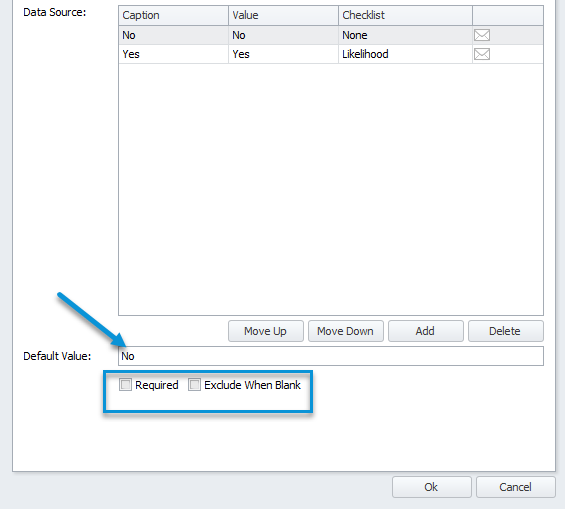
When the “Required” option is enabled, the user must complete this Checklist item. The Checklist cannot be submitted until the user has completed all the required fields.
As an example below, “Signature” must be filled (shown with asterisk symbol) before the user can save the Checklist.

Exclude When Blank If this is enabled and the checklist item is not populated with data, it will be shown as null or empty in the database and will not be shown in the Checklist result report. This is very useful for any Checklist reports that have items such as description or note that are not always populated but display on the report when they don’t need to.
Include in Report: This is enabled by default ensuring the checklist result displays on the checklist report.
However in instances where clients may want to record results but not have these display on a checklist report (that may be going to clients) this setting can be disabled ensuring the item does not display on the checklist report.
9. Email Checklists
Checklists can be emailed to various email addresses. It has the ability to choose the recipient of the checklist PDF in an email. Checklist Report and some Checklist Items (Drop Down List, Radio Buttons, CheckBox, Multi-Select) have an ability to configure email settings. Check below links for more details.
Email options on Checklist Report: Checklist report can be emailed to various internal and user-specified email addresses. Please follow the steps below.
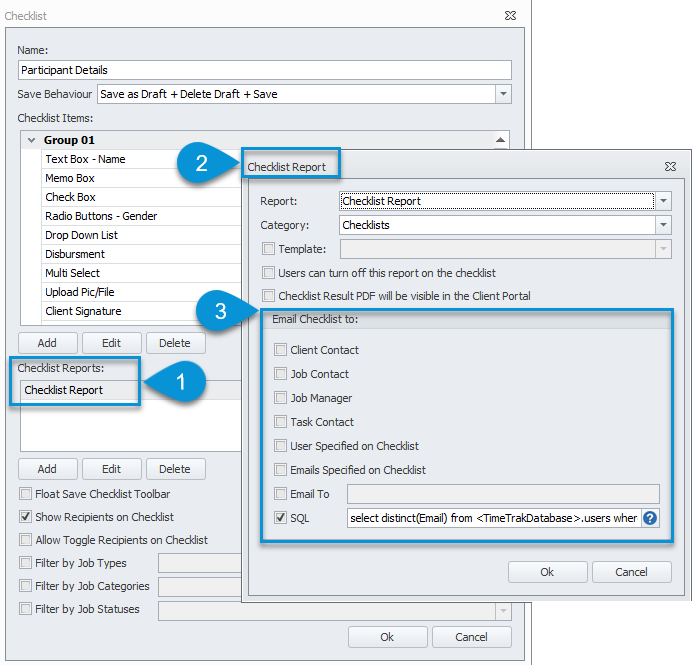
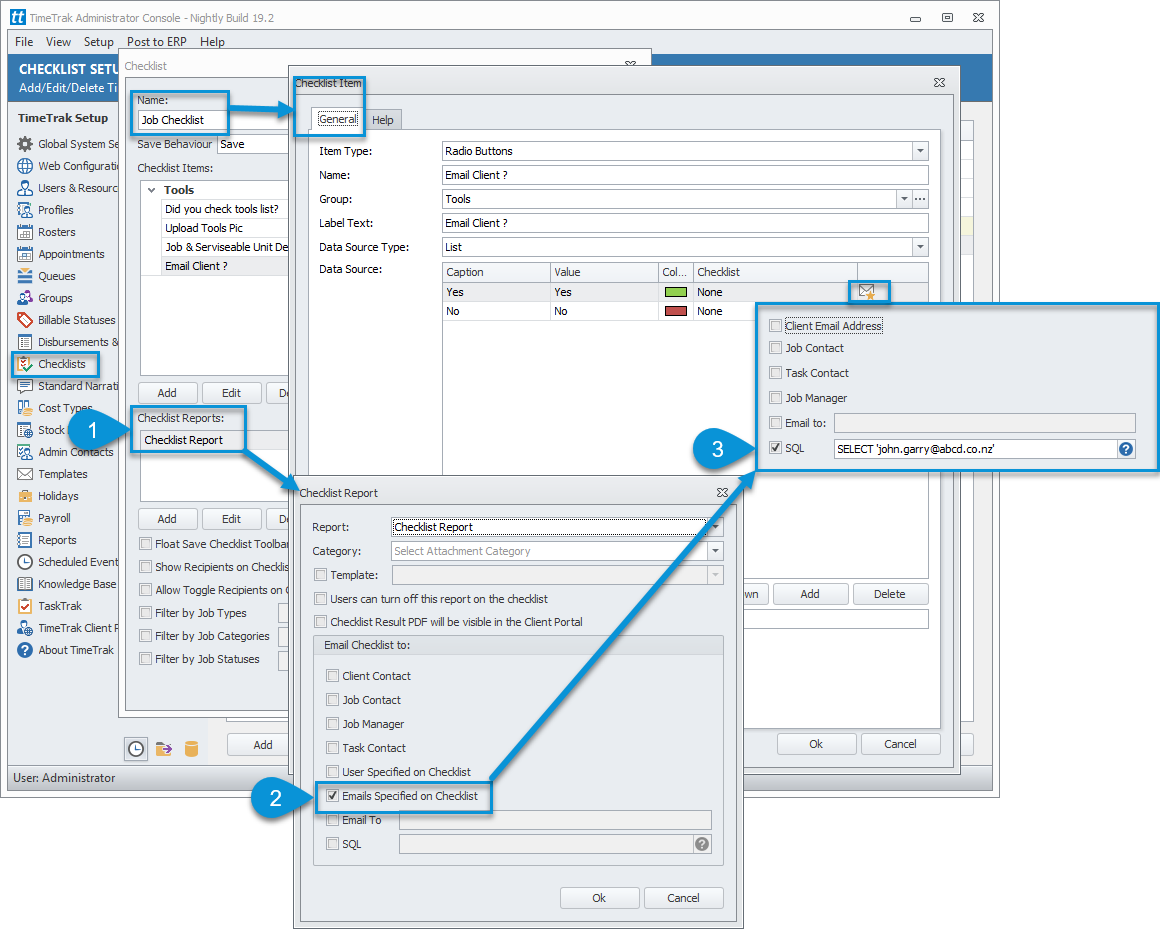
Any Checklist Report that has Emails Specified on Checklist will email the report to the specified in the Checklist Items.
Example: you may have a checklist that requires by the client. The Checklist Item with a radio button that says “Email Client” and on the “Yes” option has an email specified or populated from the database. This report will only be sent to emails specified in the checklist items (item 3 in below screenshot).
You may have a different checklist report with additional information for internal use and should be ONLY seen by internal admin staff. You can specify internal admin email as per below.
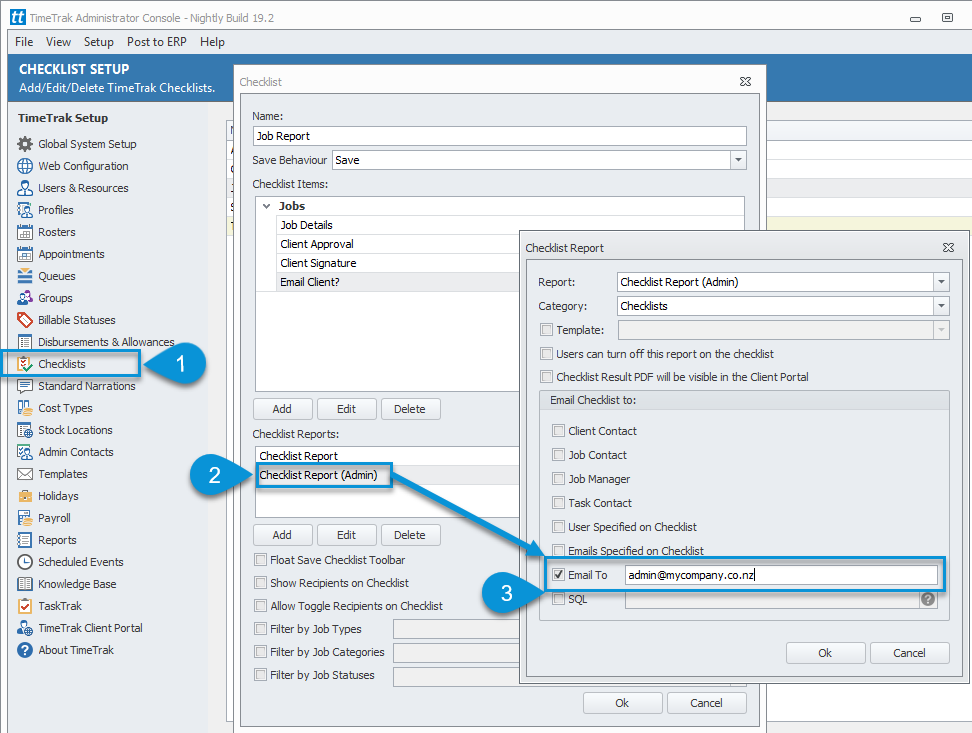
Once the checklist is completed by the TimeTrak Mobile staff, two checklist reports will be sent to the client email and internal admin contact.
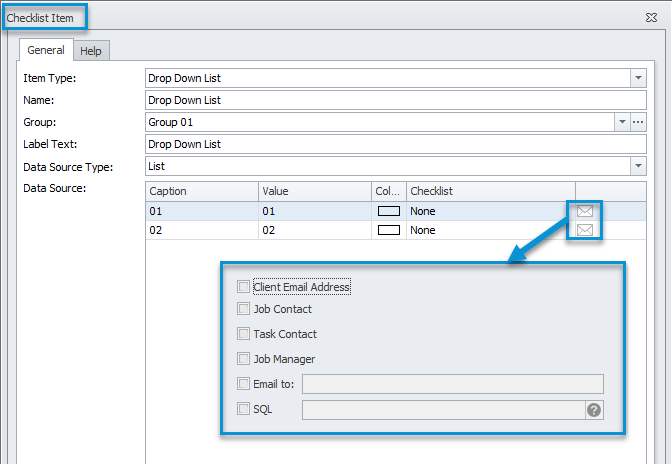
Email configuration on Checklist Items: The same email options that are available against a Checklist report are also available against Checklist items. When you click the mail symbol on the far right column, you can specify whom you would like the Checklist result emailed to.
A working example of this could be that HR requires Checklist results to be emailed to them if users have identified a hazard.
Against the Yes caption of this Checklist item, the HR email address could be passed into the “Email to” field which would email them the Checklist results on the occasion that a user answered yes to this question.
10. Copy Options in Checklists
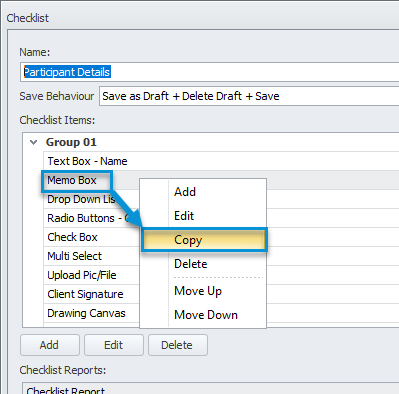
Against an actual Checklist item that has been created, you have the ability to copy the item. Right-Click on Checklist Item and select Copy as per below screen.
Similarly, the full checklist can be duplicated. This option is useful if creating or duplicating large checklists with multiple checklist items.
Option 01: Right-click on any Checklist item, there’s an option to copy it as per below:
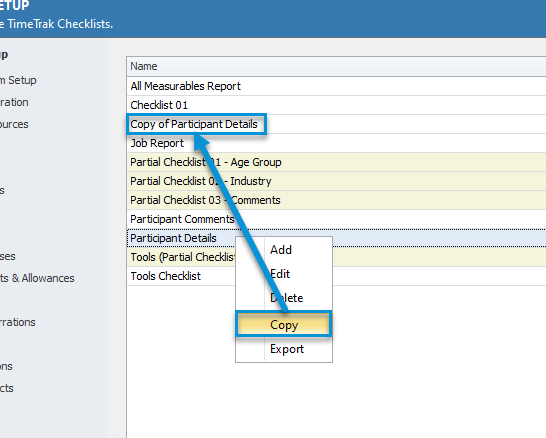
A copy of the checklist will be created. You may change rename and change checklist items as necessary.
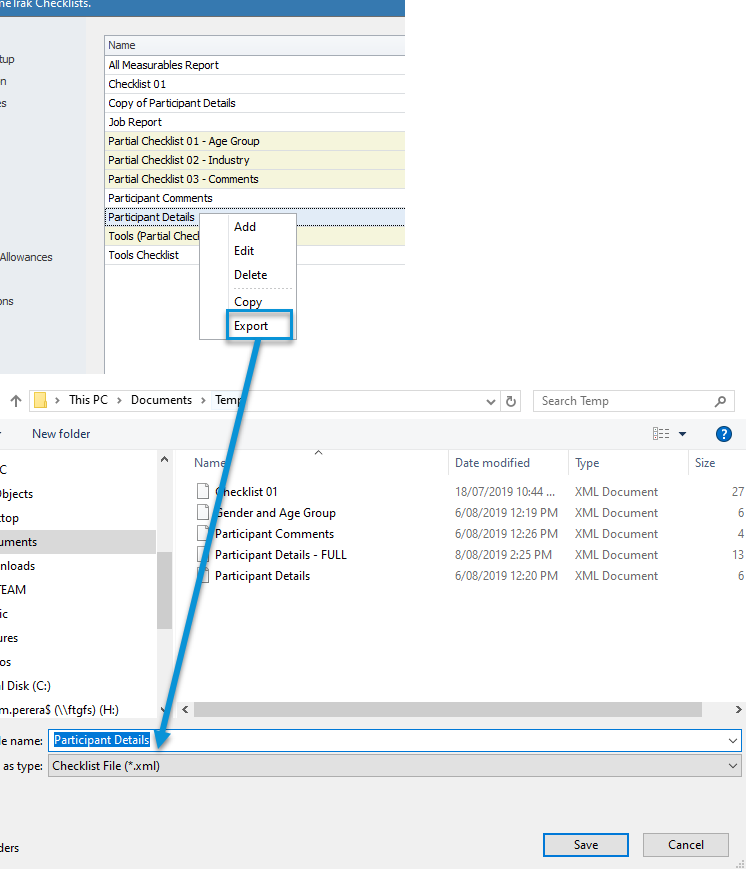
Option 02: TimeTrak has an ability to duplicate an existing Checklist and import/export it to be used in another system (e.g. test environment). Right-Click on the Checklist and select Export. The checklist file will be in .XML format.
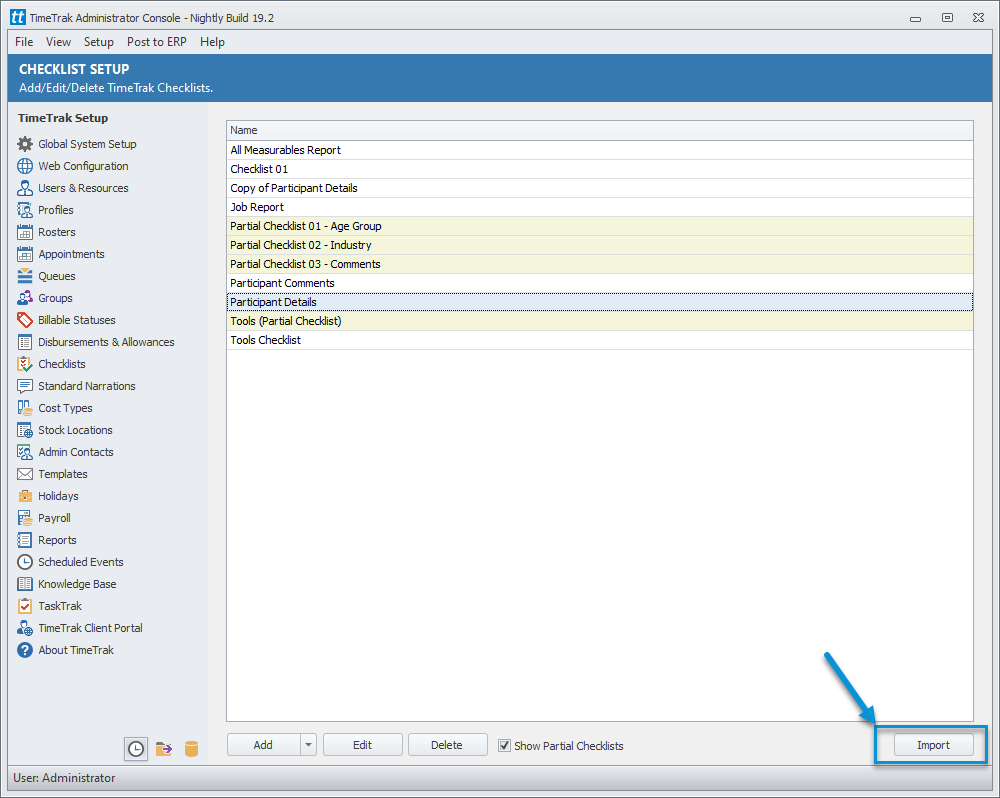
To import the file, it’s as simple as clicking the import button on the bottom right as per above in the Admin Console then browsing to the XML file.
Once the checklist is imported, add a Checklist Report and change Checklist Items as necessary.
11. Checklist Report Settings
The checklist can be created as a report document that you can review when it is submitted. Since the checklist can be created as a form, you can see and print the document as a PDF file. In here, you can assign the Checklist into a Checklist Report as default or a report that you created.
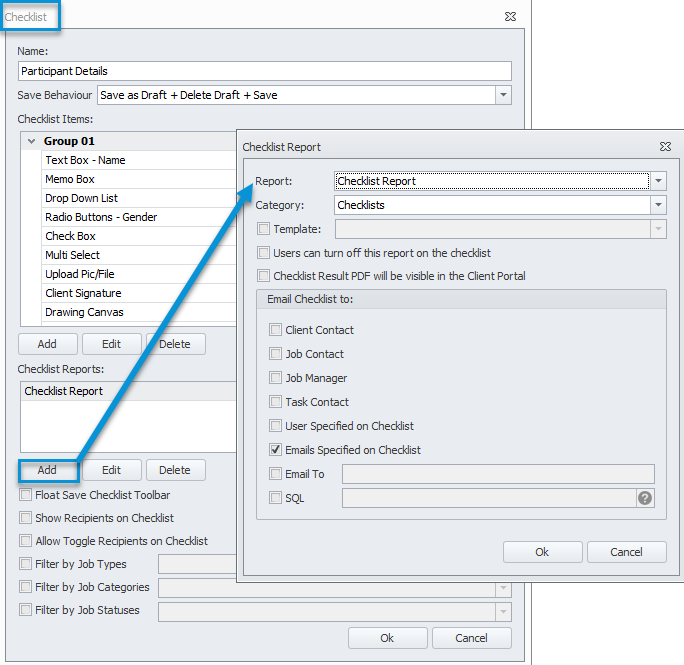
Report: This dropdown list will bring up all the reports that can be assigned for Checklists.
Note: you need to set your report setting and the category as a Checklist.
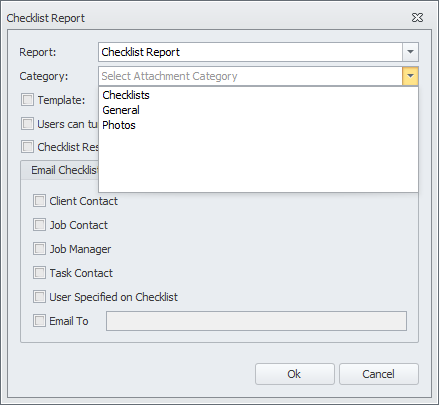
Category: By default, there are three attachment categories as per below ‘Checklists’, ‘General’ and ‘Photos’.
TimeTrak has the ability to add more categories. Select TimeTrak Admin Console > Global System Setup > Attachments and Add as per below:
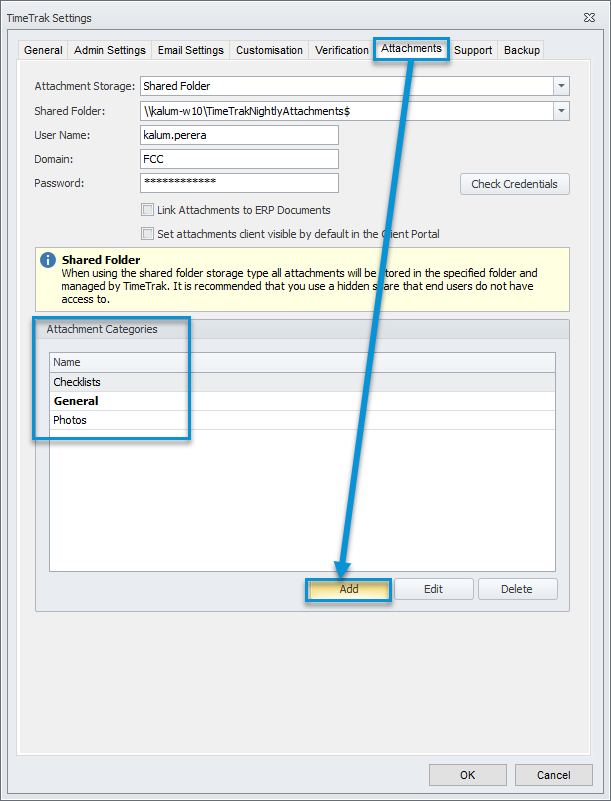
A working example of this is if a company has many Checklists that are completed against a job, and they would like the ability to filter on the type of checklists. E.g. Health and Safety could be its attachment category, where Health and Safety Checklists are assigned to by default allowing users to filter a job’s attachments on the specific attachment type.
Template: This option has an ability to use the company-specific email template for Checklist PDF document.
User can turn off this report on the Checklist: This setting allows users to choose to send or not to email this report. Since a Checklist can have any number of reports assigned to it, this option is useful to control recipient list from user level.
Save Checklist Result PDF as Attachment: This option which is enabled by default, defines if the checklist will be saved as a PDF as an attachment on completion.
In some instances, clients may not want the checklist to save as a PDF to save file storage and just run the checklist report when required.
Checklist Result PDF will be visible in the Client Portal: This option allows Checklist report (PDF) to be visible in TimeTrak Client Portal for clients who have access to attachments.
Email Checklist to:
- Client Contact – Report will be emailed to the default contact assigned to the Debtor Account.
- Job Contact – Report will be emailed to the contact assigned to the job.
- Job Manager – Report will be emailed to an internal job manager.
- Task Contact – Report will be emailed to the contact assigned to the task.
- User Specified on Checklist – This will allow the user to enter email addresses manually when filling out a checklist in TimeTrak Mobile.
- Email to – Report will be emailed to any addresses entered into this field.
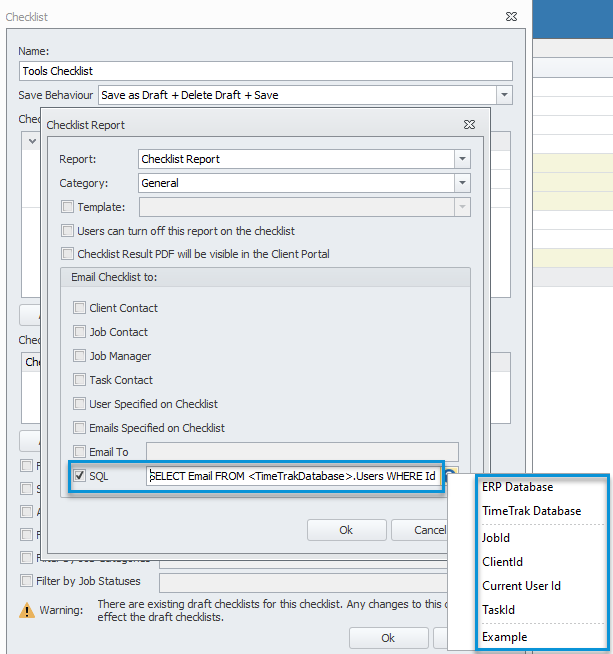
- SQL – Report will be emailed to email ID pulled through from either ERP or TimeTrak Database. As an example, if you prefer to email the checklist to currently logged-in staff, you may use below SQL query.
SELECT Email FROM <TimeTrakDatabase>.Users WHERE Id = <CurrentUserId> (Note: quick items are case sensitive)
12. Standard Narration in a Checklist
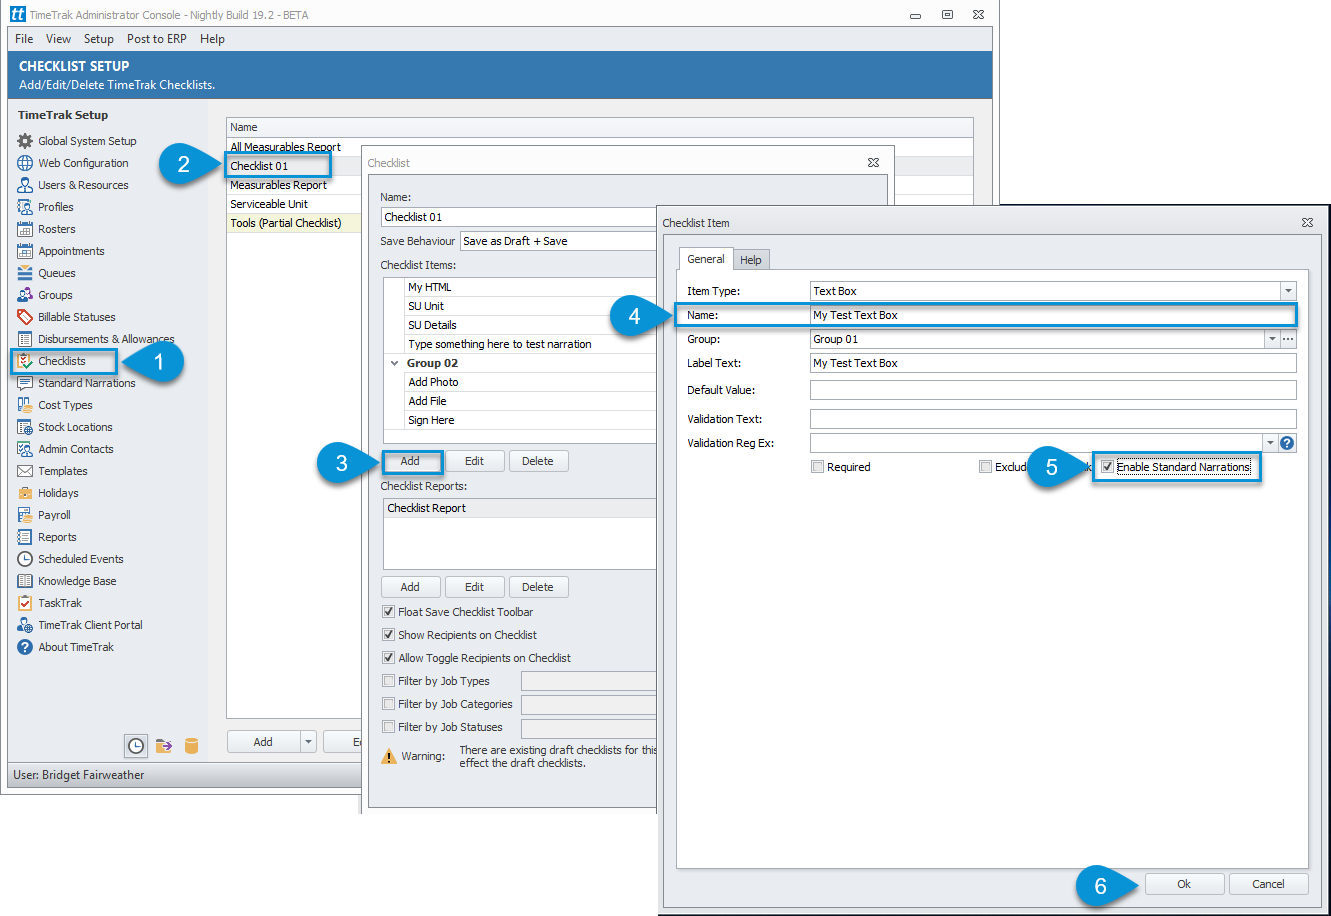
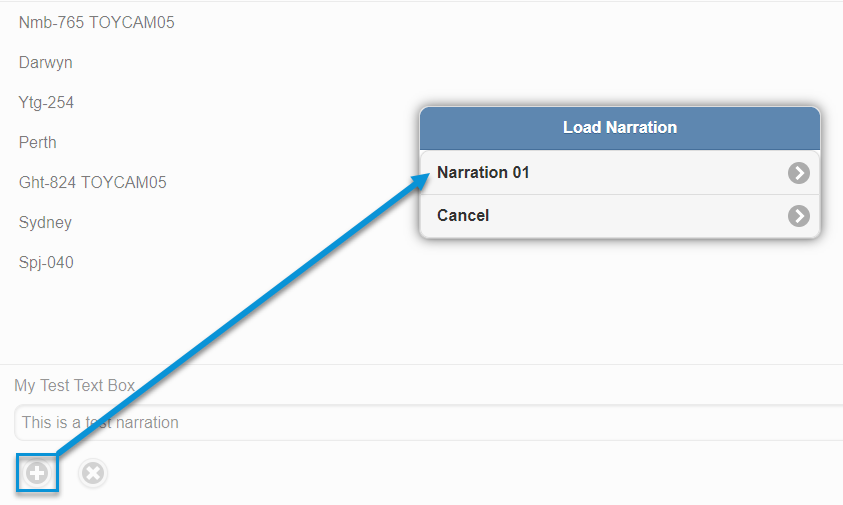
TimeTrak 19.2 has an ability to add standard narration to checklists. This feature will allow users to load a pre-set narration by clicking + icon on the checklist.
To enable this option, configure Standard Narrations in TimeTrak Admin Console.
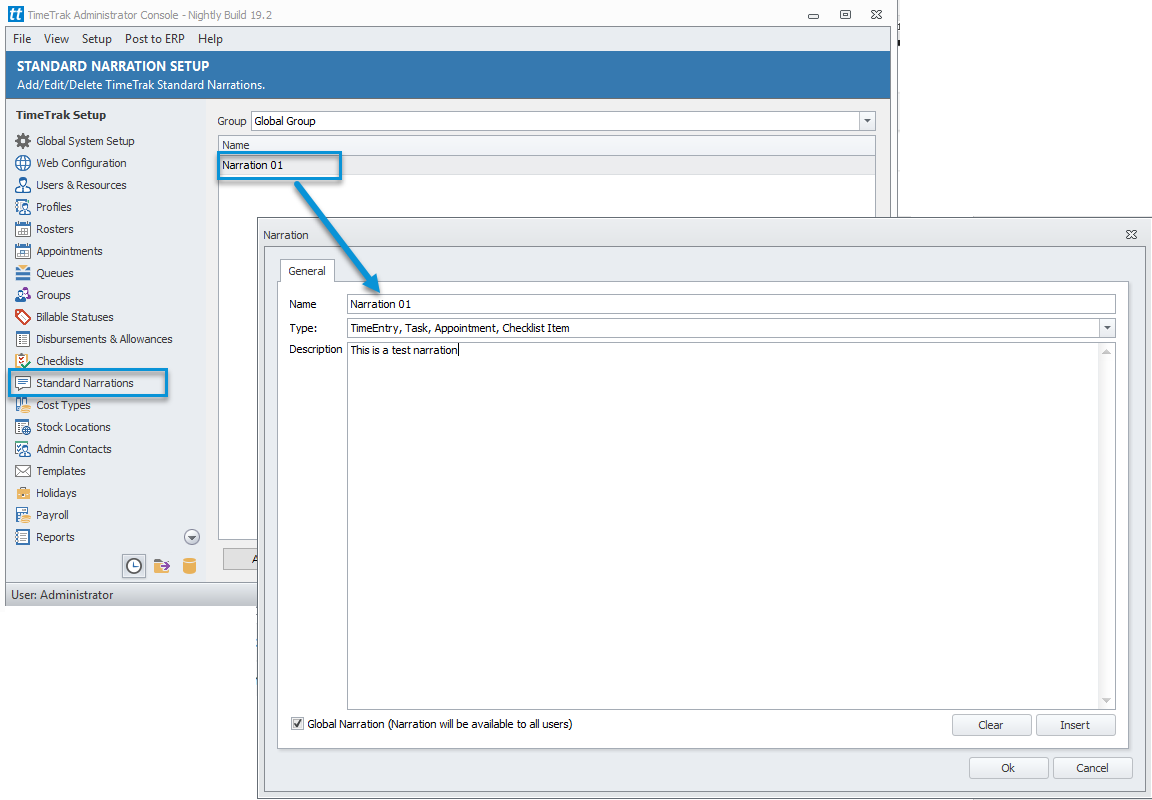
Enable Standard Narration in Checklist as per below steps.
Standard Narration will be added to the checklist once + icon is clicked in TimeTrak Mobile.
13. Checklists against Tasks
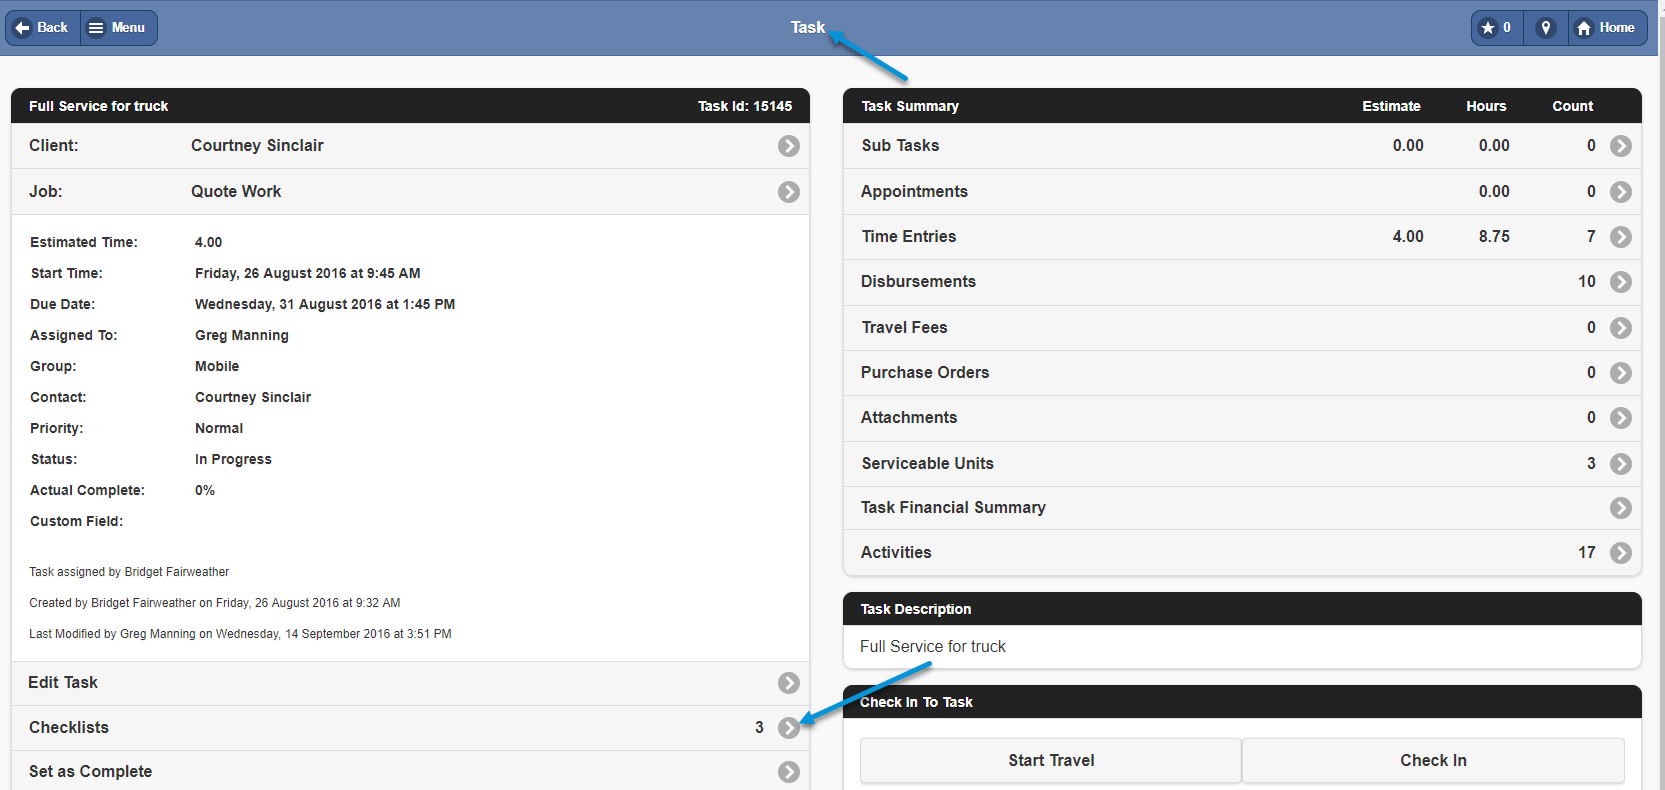
Checklists are now available at a Task level. Previously if users were checked into a task and needed to complete a “visible” checklist (one that is manually run, not event-based), the mobile user would need to go into the job to run the checklist. Now checklists that are visible against the user’s profile and meet the requirements specified at the checklist level (job type, status etc) are available to be run from the task in mobile as per below:
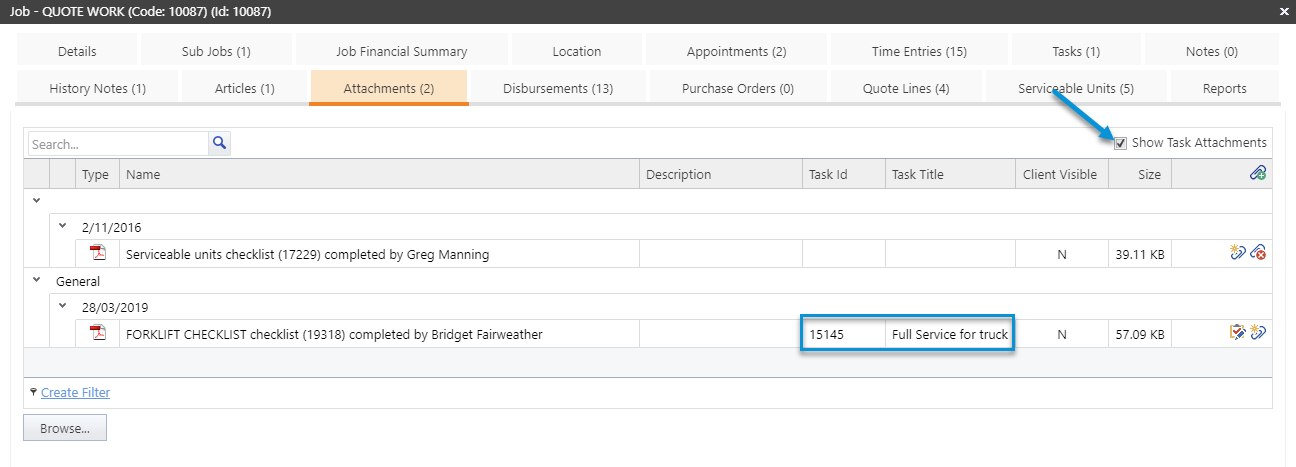
Checklists completed against the task then display in the task attachments.

Task attachments now also pull through to the job when “show task attachments” is enabled as per below. Task Id and Title columns have been added to provide the ability to quickly reference the attachments by the task.
14. Checklist Tab in TimeTrak Professional
From version 19.3 via TimeTrak Professional, against the job there is a new Checklists tab which displays checklists that have been completed against the job and can be re-run via the checklist report icon as per below:

When the checklist is run via the report icon above it will run the checklists results in the current report format meaning if you have made changes to your checklist report historic checklists can be re-run in the new format.
The original checklist and report format it was completed in is still available via the attachments tab as per below if Save Checklist Result PDF as Attachment is enabled against the checklist report attached to the checklist.
